
If you’re an advanced macOS user who knows your way around partitions and drive management, chances are you’ve heard of TestDisk – an open-source utility known for rebuilding lost partitions and recovering damaged boot sectors. For years, it’s been a go-to solution in technical circles whenever a disk refused to mount or a partition vanished after a formatting mistake.
But as an interesting part, if you simply Google “free data recovery software Mac”, TestDisk appears among the top 10 recommendations, right next to commercial tools that are not free. And it can actually be used to recover deleted files, not just to fix partition tables, though only in specific, limited cases.

💬 That alone made it worth testing. So, our team at 7 Data Recovery Experts decided to perform a full TestDisk data recovery review to see how well this tool works in practice. We wanted to verify its real recovery potential on macOS, and, most importantly, determine when to use TestDisk, where its strengths truly shine, and where its limitations make other recovery tools a better fit.
Quick Summary of TestDisk
So, what exactly is TestDisk? It’s a free, open-source utility built to recover lost partitions and fix disks that refuse to boot. Unlike modern recovery apps with flashy interfaces, TestDisk works at the system level. That’s why it’s often the tool of choice when macOS stops recognizing a drive or a partition disappears after repartitioning or a crash. The program can also undelete files from file systems like FAT, exFAT, NTFS, and ext2, though this function is fairly limited. It helps mainly with files that were removed recently. After a format or heavy disk use, you shouldn’t expect much more than a list of system or hidden entries.
If you need to recover photos, videos, or documents rather than restore entire partitions, CGSecurity offers another utility called PhotoRec, which comes in the same package as TestDisk. PhotoRec is designed specifically for file recovery and works differently under the hood. Still, in this TestDisk review, we focus only on TestDisk itself – how it behaves on macOS, where it succeeds, and where its limits begin.
Pros
- Completely free and open-source software with no feature restrictions or hidden fees.
- The tool runs directly from the extracted folder, which reduces the risk of overwriting data.
- Excellent for repairing logically damaged drives and restoring lost partitions or boot sectors, capabilities rarely matched by other free tools.
- It can analyze disks without a readable file system, which makes it useful for diagnosing unrecognized or RAW volumes.
- The command-line interface can feel overwhelming for less experienced users.
- It cannot recover files if their file system records have been deleted or severely damaged.
- The recovery process involves multiple steps and requires manual navigation instead of a single-click workflow.
- Scanning large drives may take several hours, depending on disk size and interface speed.
Technical Details About TestDisk
TestDisk was created by Christophe Grenier, a French developer with a background in digital forensics. He first made it public in 1998, and ever since, it has remained part of his long-running CGSecurity project (the same one that includes the well-known recovery tool PhotoRec).
More than twenty years later, TestDisk is still completely free and open-source, distributed under the GNU General Public License. Unlike many utilities from its era that turned into paid or subscription-based products, this one never did. You can download it, run it, and use every feature without paying a cent, whether it’s for personal or professional recovery work. The only money involved is entirely up to the user. Christophe keeps the project alive largely through voluntary donations, and the CGSecurity website lists several ways to contribute (PayPal, credit card, or other methods). It’s a small gesture of support that helps the tool stay independent and community-driven.
❓ And before we move further into the review, let’s first take a closer look at the functions the developer originally built into TestDisk, so you can better understand what it’s meant to do and why it behaves differently from most recovery tools.
Platform, File System, and Device Support
TestDisk works across almost every major operating system – from classic DOS (both native and in a Windows 9x DOS box) to Windows, Windows Server, Linux, FreeBSD, NetBSD, OpenBSD, SunOS, and macOS. This broad compatibility allows it to locate and restore lost partitions on nearly all file systems commonly used across these platforms.
Its ability to bring back individual files, though, is much more limited. TestDisk can only undelete data from drives formatted with FAT, exFAT, NTFS, or ext2. In practical terms, that means it can handle recovery from USB drives, SD cards, SSDs, or standard hard disks using these file systems, the kinds of devices most Mac users plug in externally.
On native macOS disks, it’s a different story. Drives formatted as APFS or HFS+ don’t support TestDisk’s file-level recovery. The program can still rebuild or restore partitions on such disks, but it won’t restore user files stored on them.
Another difference between TestDisk and commercial recovery apps lies in how they search for data. Paid tools often identify lost files by their signatures, which lets them restore information even after a format. TestDisk doesn’t do that. It depends entirely on file system metadata (the internal map that tells an operating system where data lives). Once that map is gone or corrupted, recovery stops there, no matter what file type you’re trying to recover.
Key Features
We’ve already mentioned a few times that TestDisk isn’t a classic data recovery app. Its main purpose is to repair and restore damaged disks, not to bring back deleted photos or documents. That’s why most of its built-in tools are focused on structural repair rather than content recovery.
The program’s core functionality includes partition recovery, boot sector repair, the ability to inspect corrupted file system tables and fix logical errors, and file copy from detected partitions. These are the operations that make TestDisk valuable when a disk stops mounting or a partition disappears.
However, this isn’t the area we focus on in our review. For our tests, we looked only at one specific feature, the Undelete option, which you can find under the Advanced section of the program’s menu. It’s the only part of TestDisk that deals directly with file recovery on macOS.

There’s also one less-known but useful addition – TestDisk can create a backup of a disk or partition, located in the same Advanced section where the undelete feature resides. It’s a practical safeguard before attempting any repairs.
And that’s essentially where TestDisk’s feature set ends. There isn’t a wide range of extra tools to analyze or compare. But that’s not a drawback, the program was never designed to compete with commercial data recovery suites. Its purpose has always been to repair disk structures rather than act as an all-in-one recovery solution.
User Interface
If there’s one thing that might turn new users away from TestDisk, it’s the interface. The program works entirely through a terminal window, and that alone can be intimidating. There are no buttons, icons, or progress bars, just text and keyboard navigation. The good news is that you don’t need to type any commands manually. TestDisk displays available actions on the screen, and you simply use the arrow keys, Enter, or letter shortcuts to move through the process. Still, the first time you open it, it’s easy to feel lost and unsure what to do next.
For that reason, we strongly recommend going through some documentation before running the program. The official CGSecurity website provides a lot of material, including a detailed testdisk.pdf manual, roughly 60 pages long, that explains step by step how to use the software on different platforms. The site includes clickable references to articles with screenshots for actions like recovering lost partitions, repairing damaged FAT/NTFS boot sectors, and undeleting files.
If that format feels too dense or inconvenient (and for many users it will), it’s worth checking YouTube tutorials or other video guides before starting. Without at least a basic understanding of the workflow, you risk doing more harm than good, for instance, overwriting a partition or file instead of recovering it, which could make future restoration impossible once you learn how the tool actually works.
As for a graphical version, there isn’t one, and after more than 20 years, it’s safe to assume there never will be. TestDisk has looked the same for decades, and its developer doesn’t appear interested in changing that. You either get used to the terminal view or move on to another tool.
The actual workflow also differs drastically from what you might expect if you’ve used commercial recovery apps before. In tools like Disk Drill or similar software, you simply highlight a drive and click a button like “Search for lost data.” TestDisk, on the other hand, requires you to create or skip a new log file, then choose the correct disk, and only after that locate the needed function. The program does show text hints about which keys to press next, but they’re easy to overlook if you’re not paying attention.
Still, it’s important that TestDisk doesn’t compete on user experience. Commercial developers invest heavily in polished interfaces because that’s what sells licenses. TestDisk doesn’t have to. For someone who just needs to repair a lost partition or restore a boot sector, there aren’t many real alternatives, and since this one is completely free, most users facing that problem will probably end up choosing it anyway.
Pricing and Editions
TestDisk isn’t the first tool we’ve reviewed on our platform. Usually, this section is where we break down what versions a program offers (free or paid) and explain what’s included in each plan. Most commercial data recovery tools split their features across editions, sometimes with limited functionality in the free tier and the full set hidden behind a subscription.
With TestDisk, there’s nothing like that to discuss. The program is completely free. There’s no time-limited trial, no “Pro” version, and no locked tools waiting behind a paywall. Every feature is available from the moment you launch it, no subscriptions, no hidden upgrades, and no ads disguised as offers.
The only form of payment TestDisk accepts is voluntary donation, and even that isn’t integrated into the app itself. If you want to support the project, you can do it directly through the official CGSecurity website. The amount is entirely up to you – a dollar, a hundred, or a thousand, if you feel generous.

Customer Support
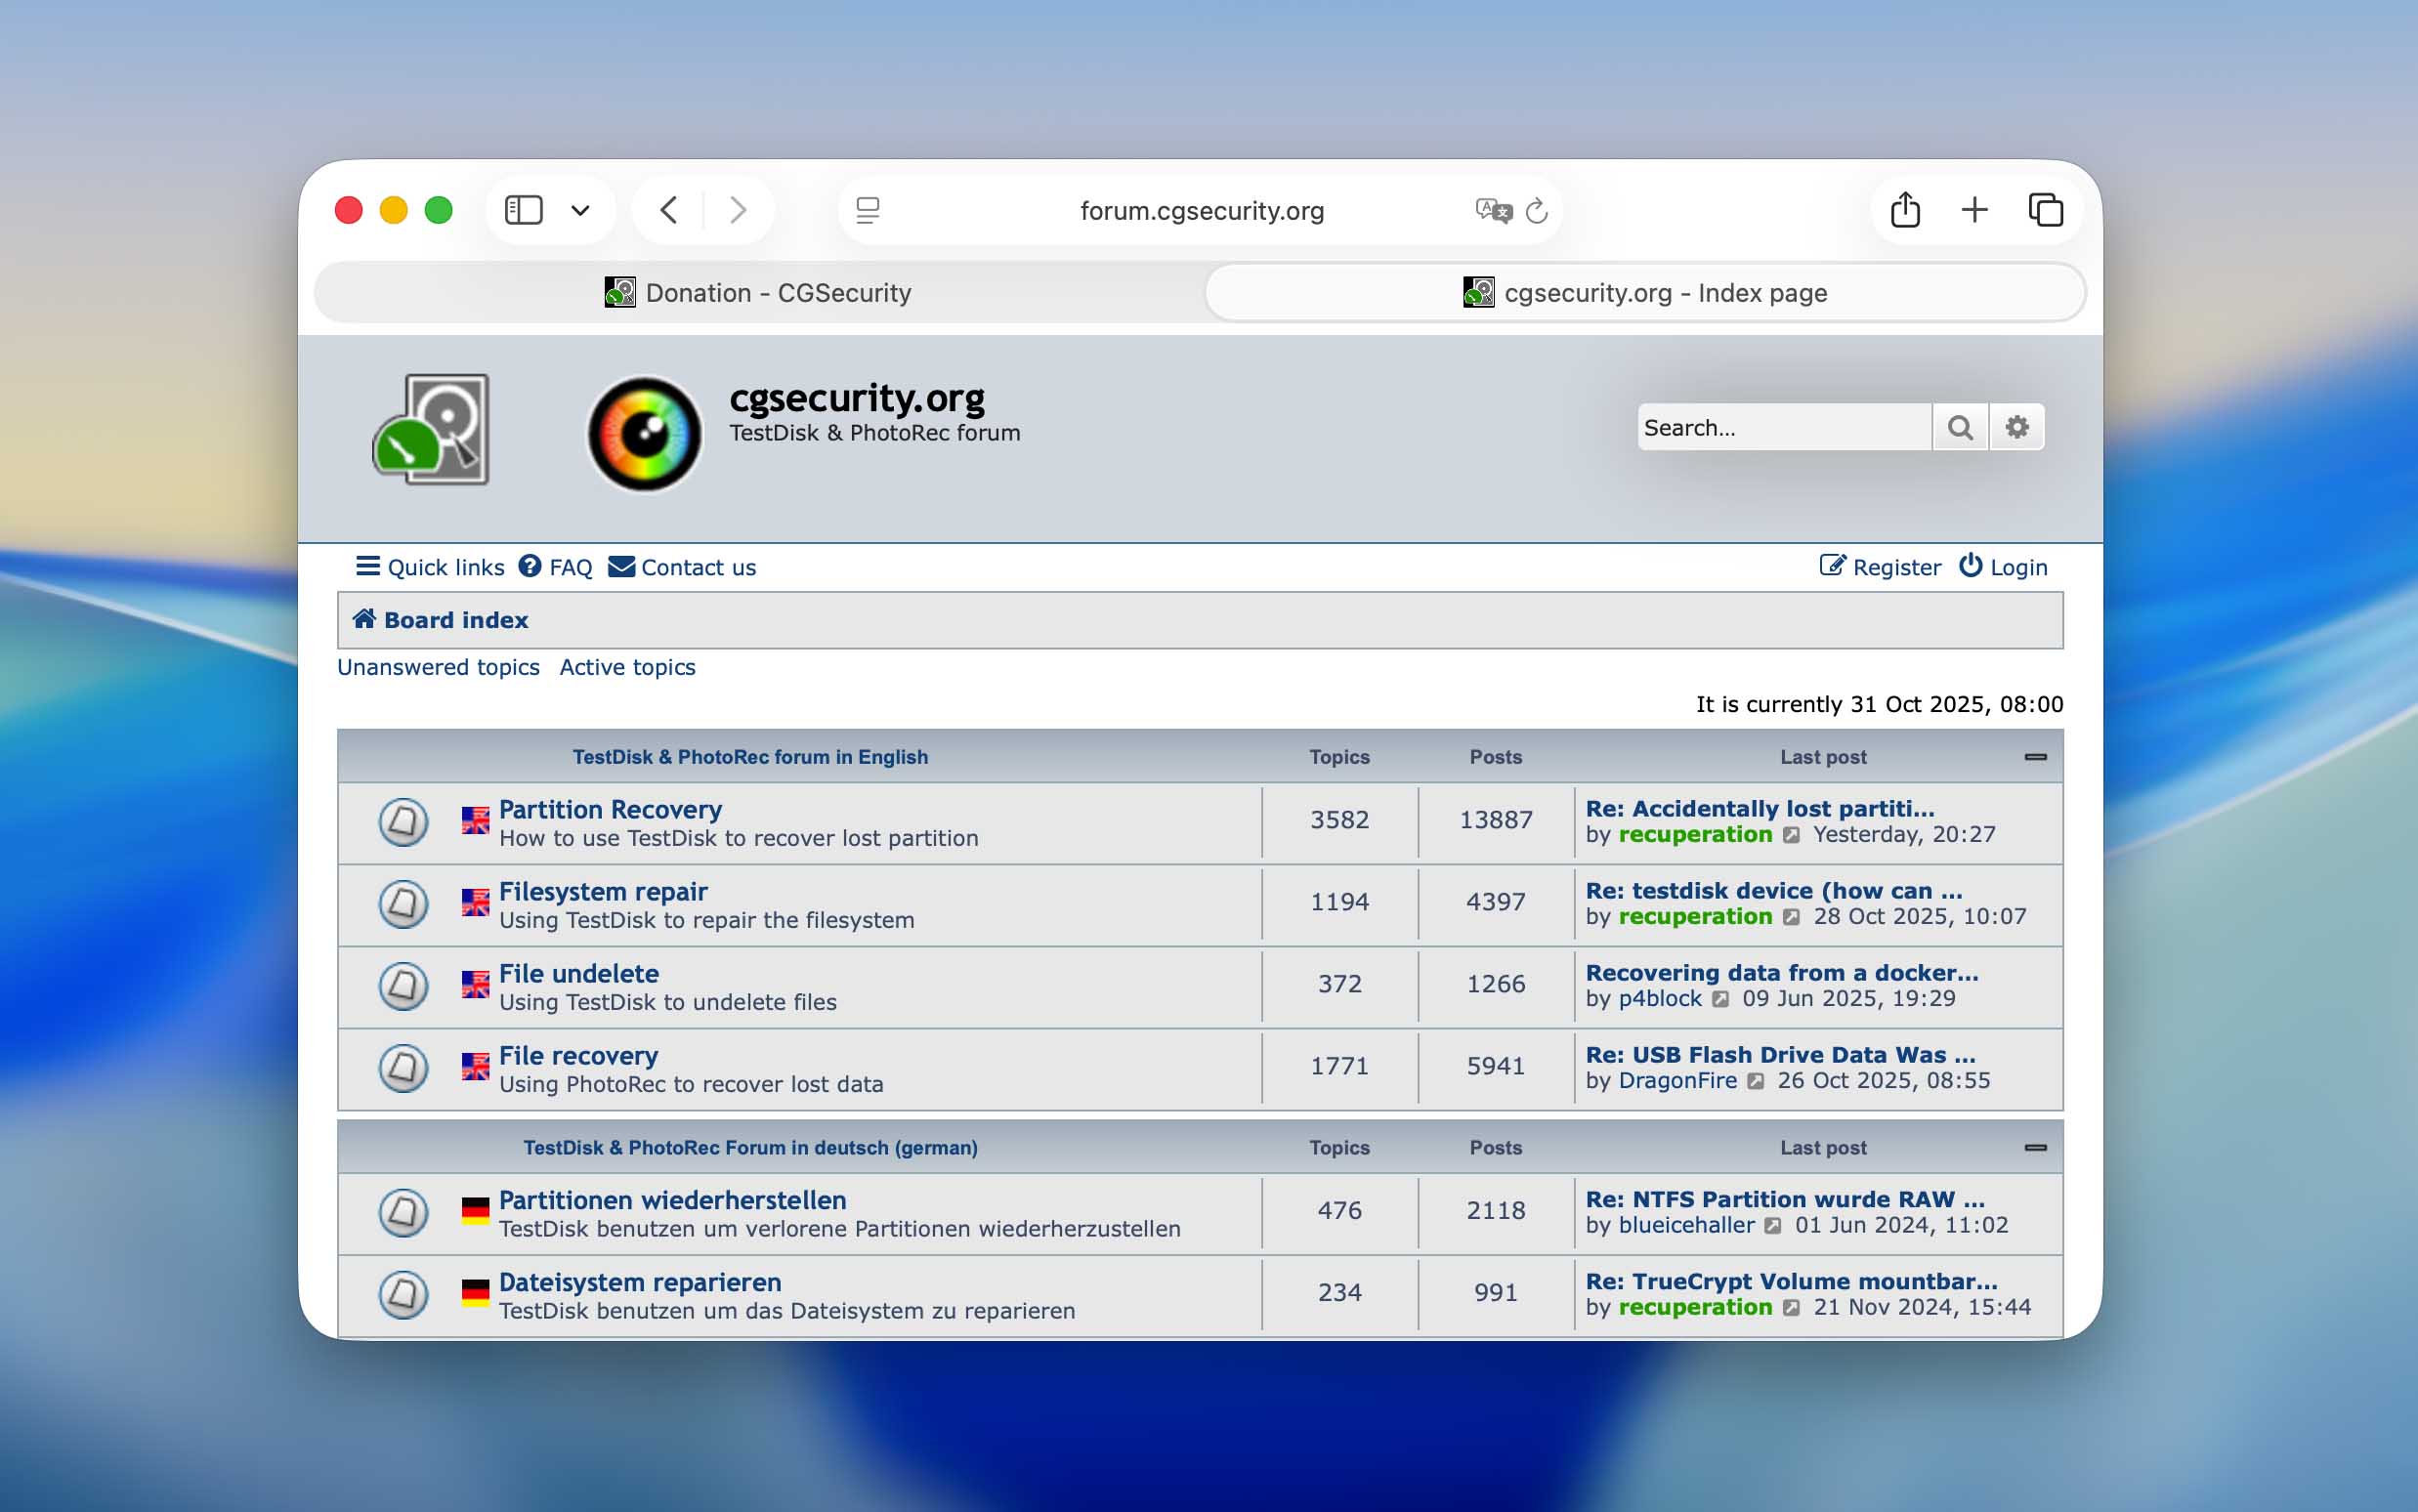
Unlike commercial recovery tools that often come with full support teams, TestDisk operates on a much simpler model. There’s no live chat, no email hotline, and certainly no 24/7 phone line. Instead, the entire support system is built around the official CGSecurity forum.
The forum is divided into several key sections – Partition Recovery, File System Repair, File Undelete, and File Recovery (the latter focused mainly on PhotoRec). Each section contains hundreds or even thousands of discussions, depending on the topic. Before creating a new thread, users are encouraged to search for existing discussions that match their issue. Only if nothing relevant shows up should you start a new topic, and preferably, not with something as vague as “it doesn’t work.” Detailed information helps the volunteers who answer there respond faster and more accurately.
To check how quickly users get help, we didn’t post anything ourselves (we didn’t want to take time away from real cases), but we did browse through recent threads. The results were surprisingly positive. In many cases, responses arrived within a few hours, and most unanswered questions were picked up within a day. Of course, that’s slower than paid software where support agents are available around the clock, but TestDisk is a free project with no official support department. Most likely, the few people replying on the forum are either long-time contributors or volunteers supported through community donations.

There’s also a contact email for the developer (grenier@cgsecurity.org), but it’s meant strictly for bug reports or feature requests, not general user help. The website makes that clear, asking people not to send usage questions directly.
All things considered, we’d say TestDisk’s support is more than respectable for a tool that’s been free for over two decades. Having an active forum where users still receive useful answers, often within a day, speaks volumes. For a non-commercial project, that kind of consistency deserves real respect.
How Do We Measure TestDisk Recovery in Our Tests?
This question stayed open in our team for quite a while. We had to decide how to evaluate a recovery program where data recovery isn’t the main purpose. For all other reviews, we’ve used the same setup (a corrupted USB flash drive and a formatted SD card) to see how each tool handles typical data-loss scenarios. But as we’ve already explained above, TestDisk can’t recover files lost during formatting. Putting it through the same test would have been unfair: the result would simply show that it doesn’t work, which isn’t true. The program just operates differently. So for TestDisk, we changed our testing conditions.
Instead of formatting the SD card, we deleted the files manually, keeping the file system intact. That allowed us to test its Undelete feature in realistic conditions. At the same time, we kept the corrupted USB drive scenario to show how well TestDisk can work with damaged partitions and attempt to repair them.
As for the evaluation criteria, that part also took some internal discussion. For most reviews, we rely on a standard set of metrics, shown below, but in this case, we had to adapt them.
| Metric | Purpose |
| Recovery Success Rate (%) | Normally, it measures how many deleted files can be restored. For TestDisk, this is a relative number. On the corrupted USB test, the rate effectively hits 100%, since once a partition is repaired, all files come back with it. But again, that’s not pure file recovery, it’s partition repair in action. |
| Scan Speed (MB/s & avg. time) | Still relevant, as TestDisk works through large drives at its own pace, depending on drive size and interface. |
| Ease of Use | Evaluates how straightforward the workflow feels for an advanced macOS user. Spoiler: it’s not beginner-friendly. |
| Value per Dollar | Excluded. The program is free, so this metric doesn’t apply. |
| Customer Support Response Speed | Excluded as well. We chose not to post new threads to avoid taking attention away from users who truly need help, as explained in the previous section. |
So, our TestDisk testing required a slightly different perspective. Instead of counting recovered files or cost efficiency, we focused on how effectively it performs the tasks it was actually built for.
Recovery Process with TestDisk
In this part of our review, we’ll show how we used TestDisk under the exact conditions described earlier. Since the steps differ depending on whether you’re restoring a partition or recovering individual files, we’ve divided this section into two separate parts. This way, the review not only explains TestDisk’s behavior in theory but can also serve as a practical “how-to” guide if this happens to be the first resource you’ve opened before running the program on your Mac.
1. Undelete Files on the SD Card
Before we move on to the practical steps, it’s worth repeating that the Undelete feature in TestDisk works only with devices formatted as FAT, exFAT, NTFS, or ext2. In our case, the SD card used for testing was formatted as exFAT (one of the most common file systems for removable media on macOS).
Before deleting anything, the card contained several JPEG photos and a few MP4 videos, simulating a typical user scenario. We intentionally removed these files without formatting the card, creating the exact conditions where TestDisk’s undelete capability can actually show what it can do.
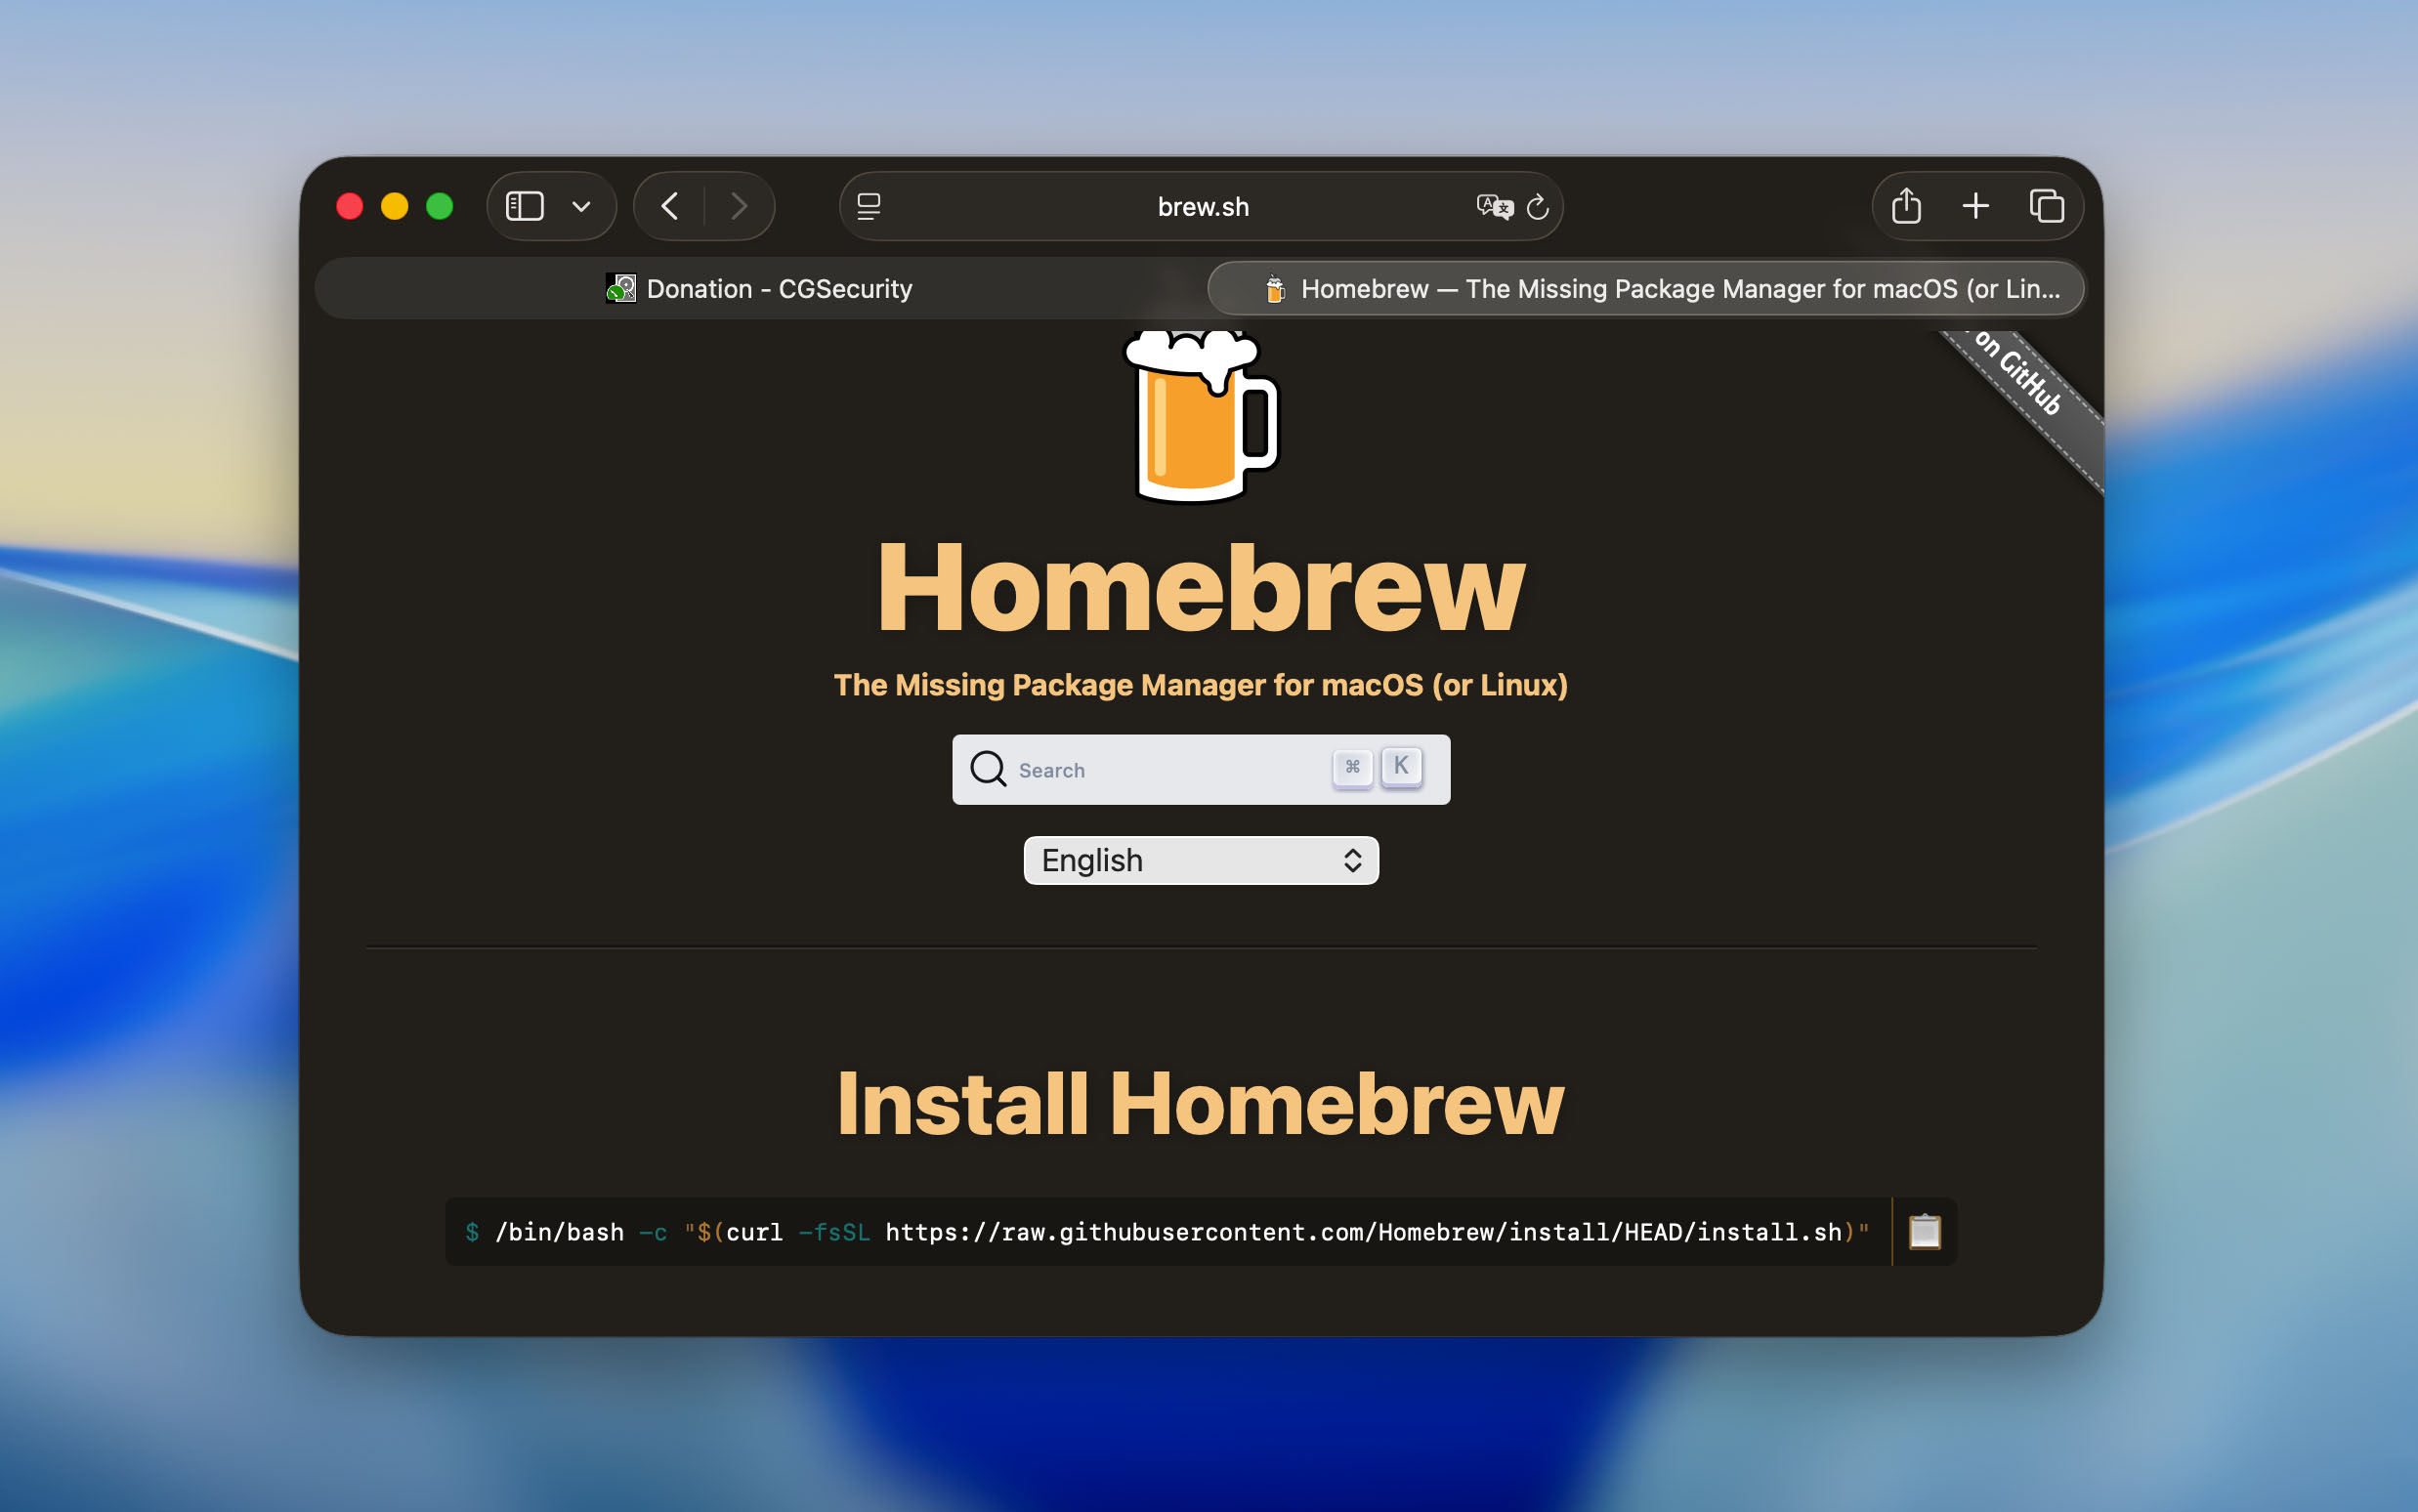
- The easiest way to get TestDisk on macOS is through Homebrew( Apple’s popular package manager). If you don’t have it yet, install it first using the command from their website in Terminal.
- Once Homebrew is ready, install TestDisk by typing: brew install testdisk.
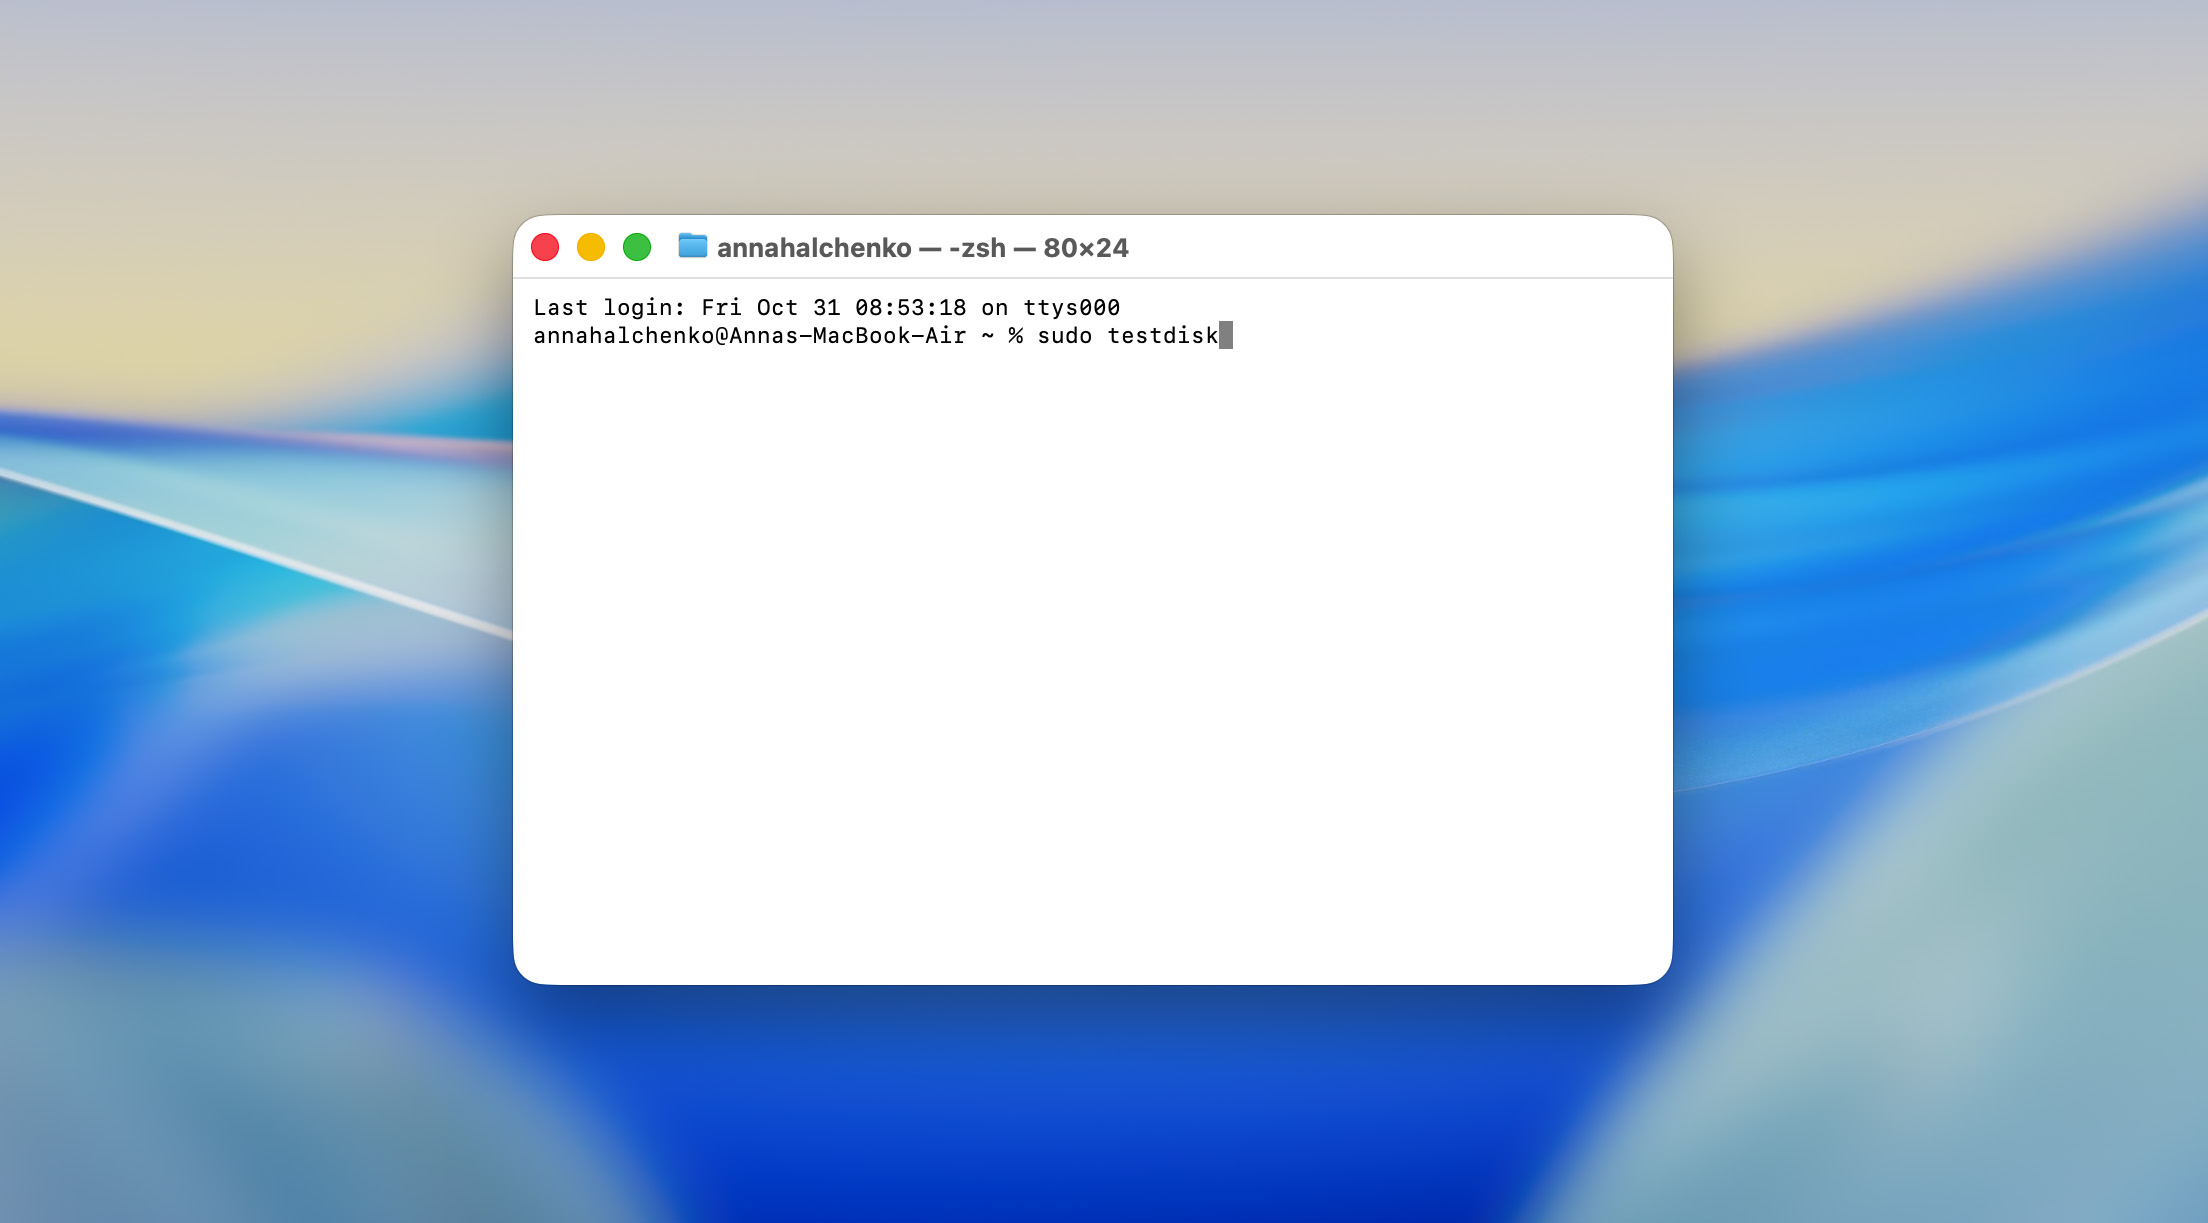
- The installation takes just a few seconds. After that, you can launch the program from Terminal with sudo testdisk. The sudo part is required because the tool needs system-level access to read and analyze drives.
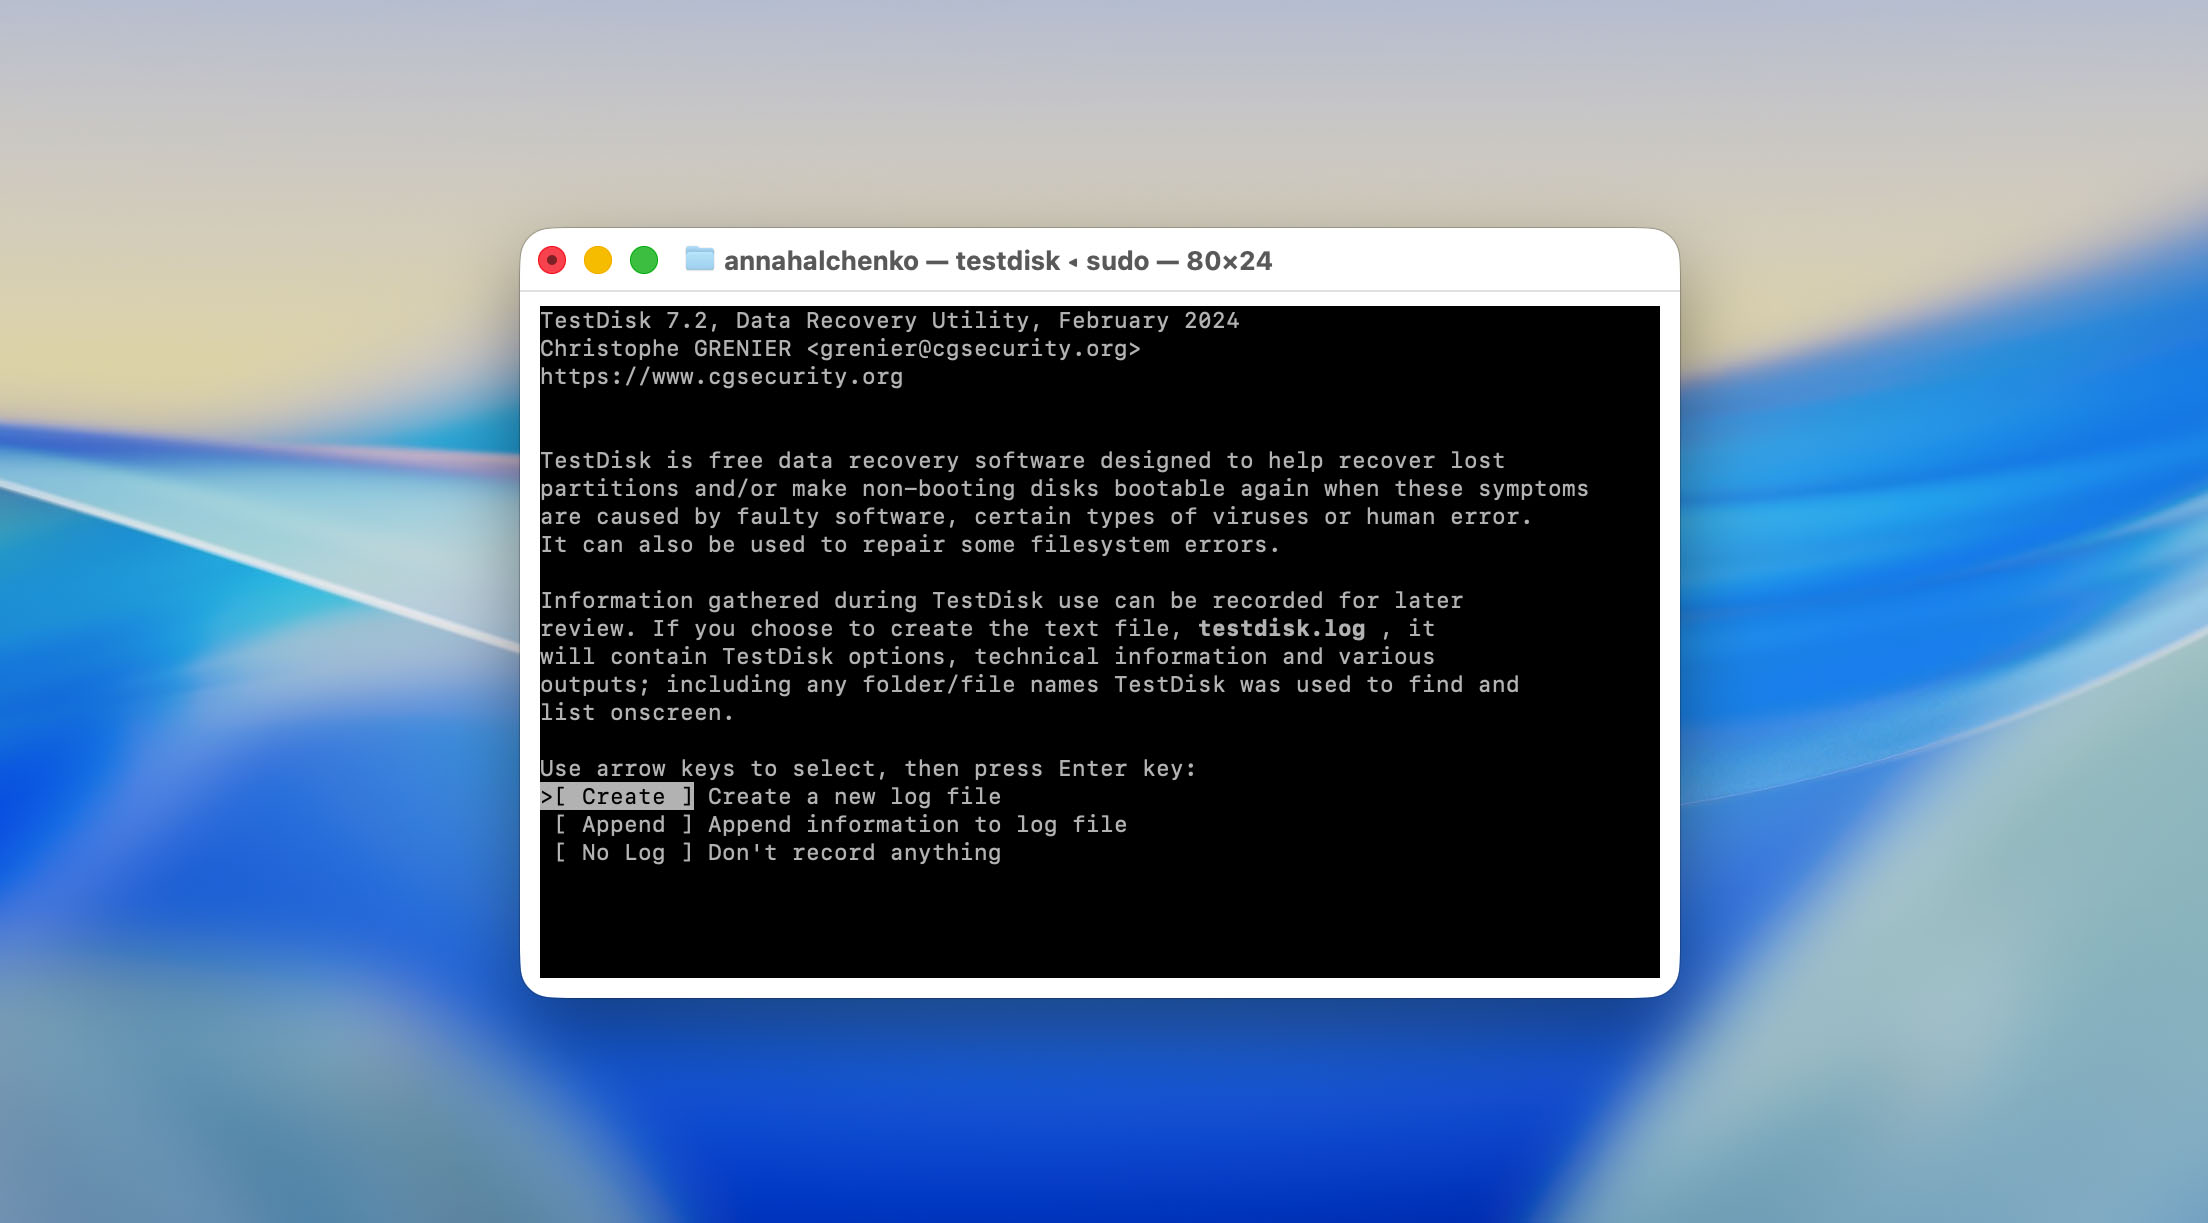
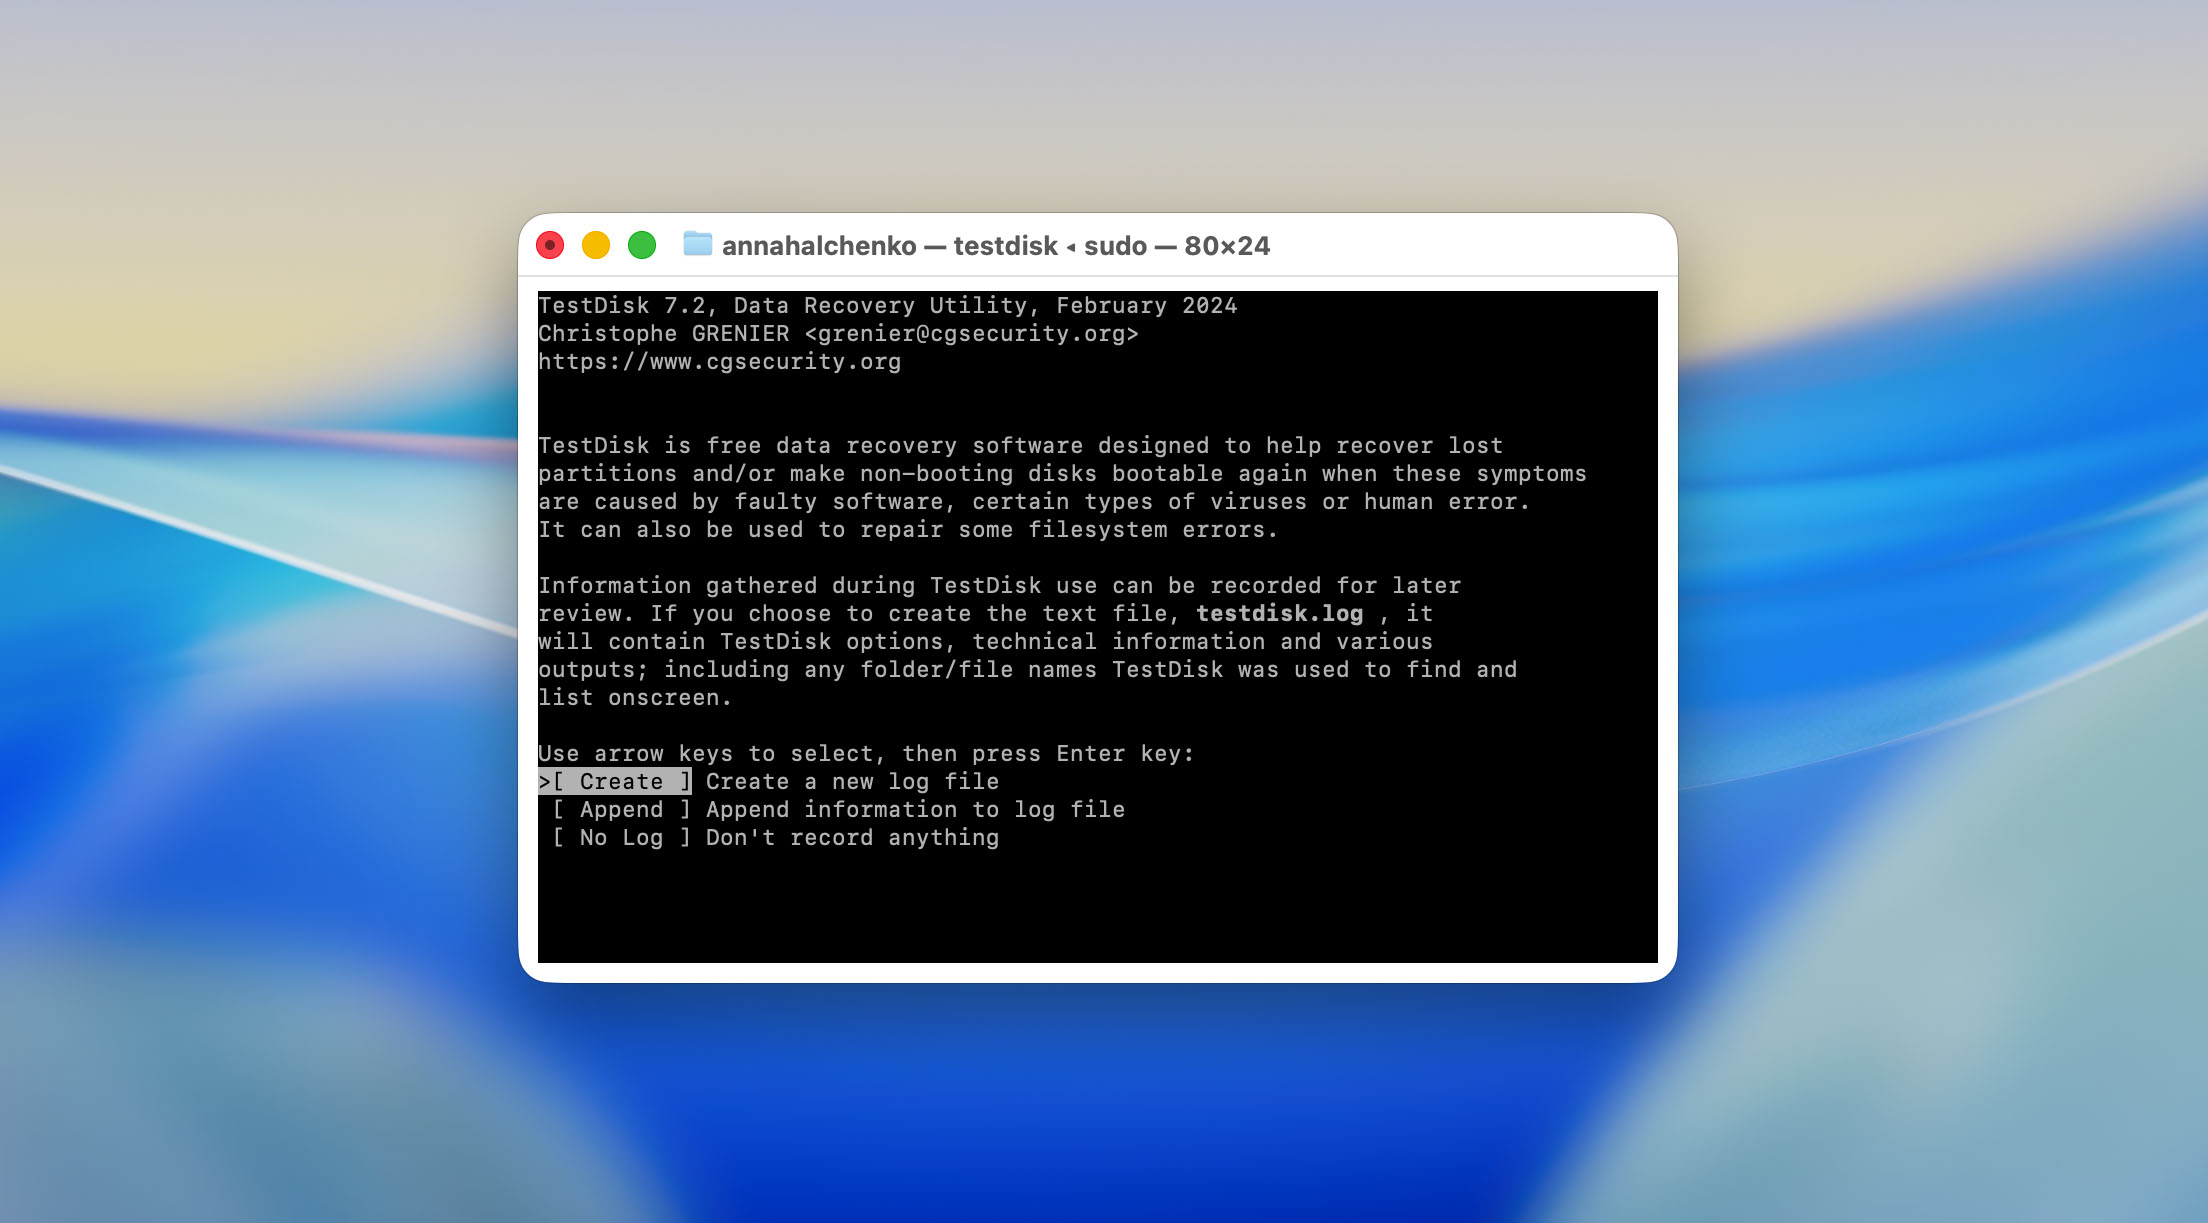
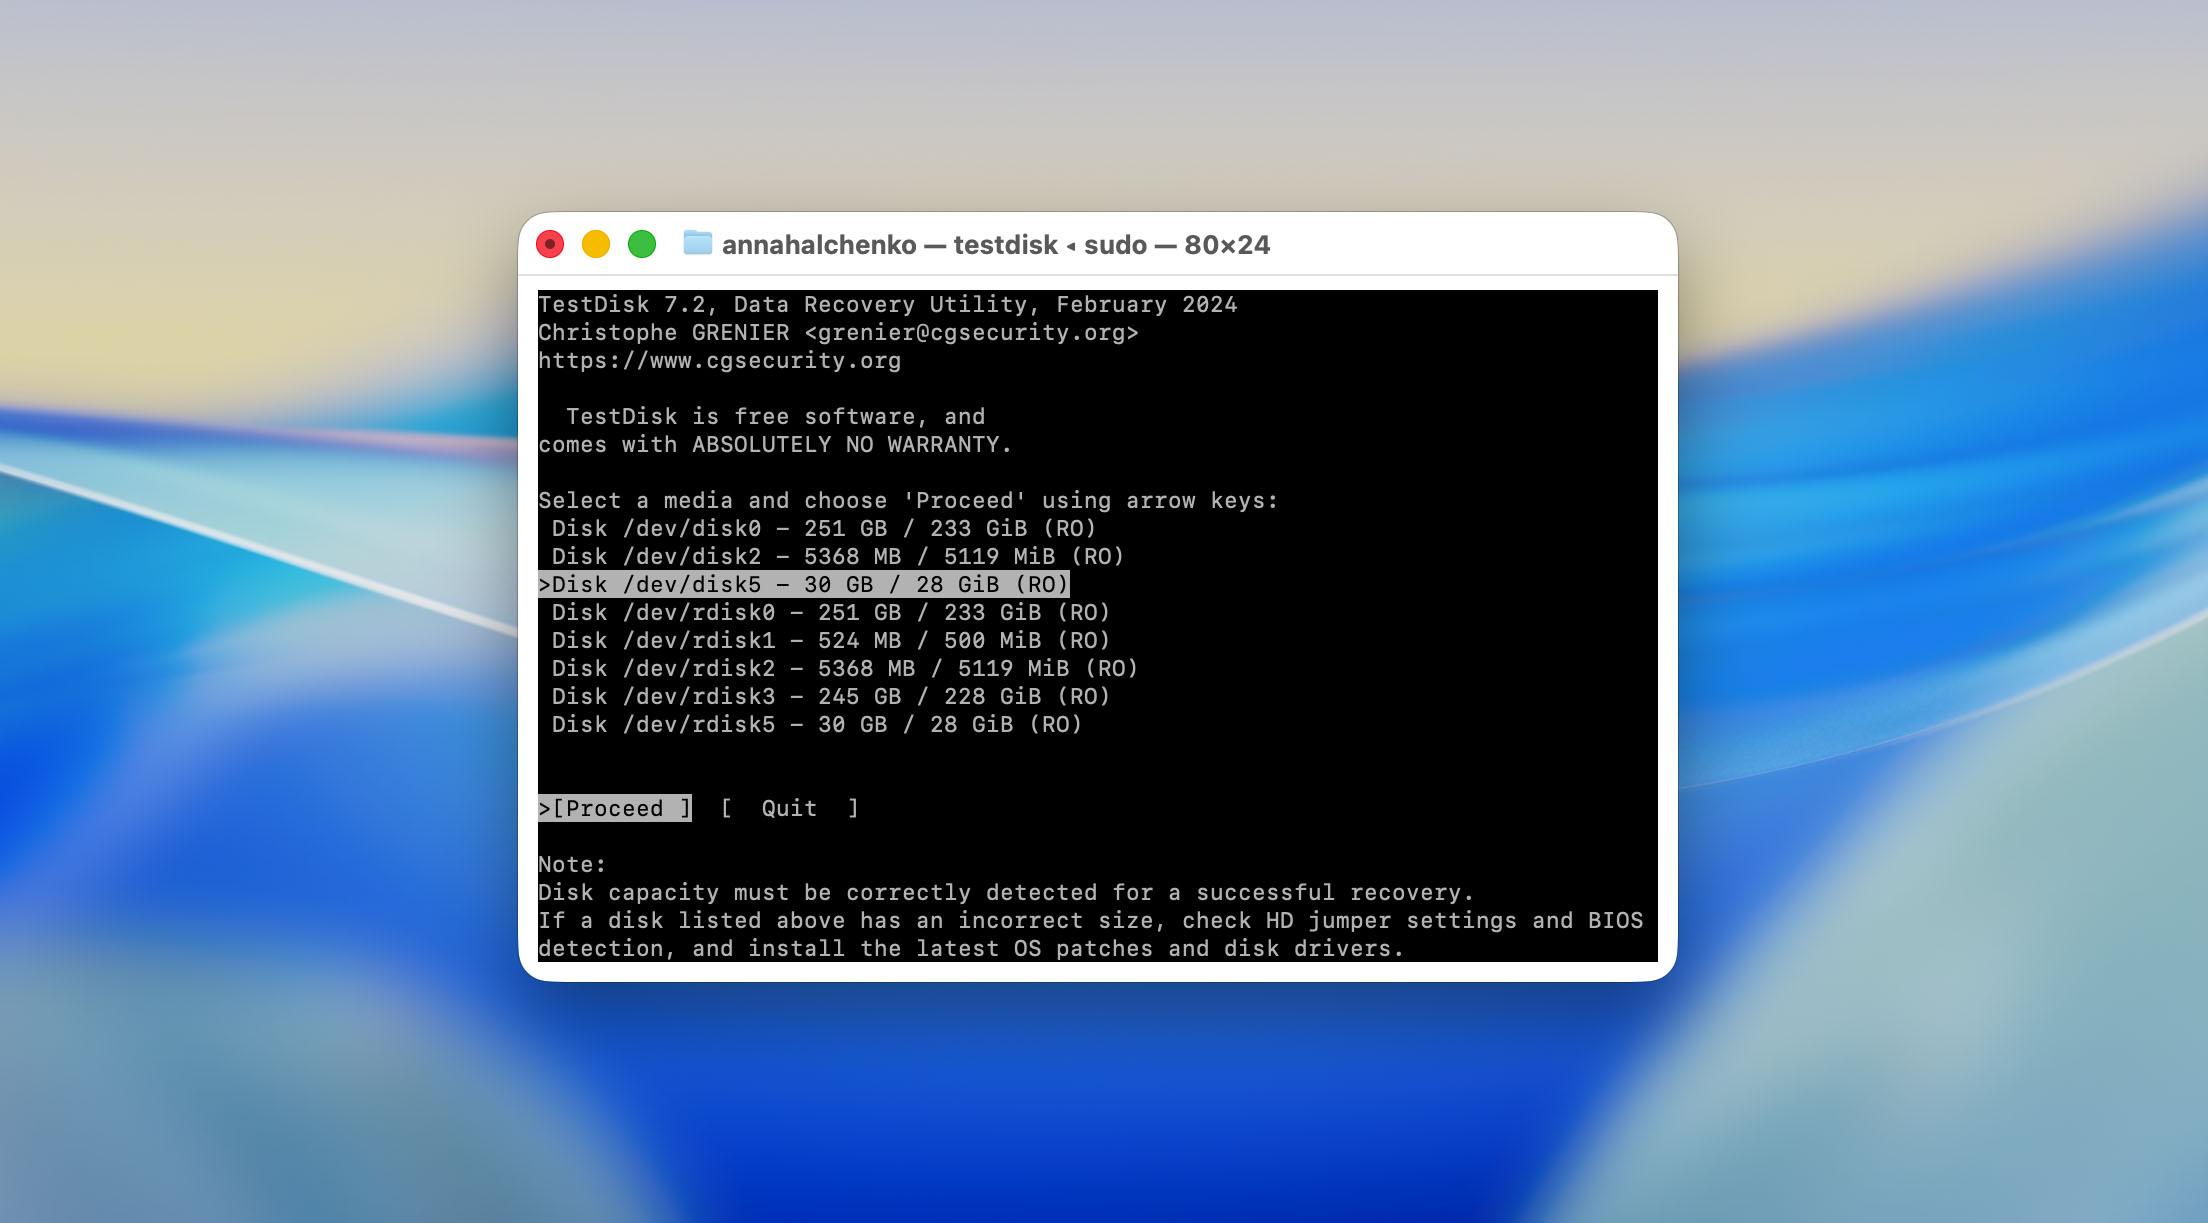
- When you start TestDisk, the first prompt asks whether you want to create a new log file, append to an existing one, or continue without it. We chose to create a new log, since it helps record every action and result.
- Next, TestDisk lists all connected storage devices. We selected our SD card, which appeared as an external drive with an exFAT file system. The program also shows its size, making it easier to identify if multiple drives are connected.
- In most cases, TestDisk automatically detects the correct partition type. On our Mac test setup, it recognized the SD card as Intel/PC partition, which is typical for exFAT media. We confirmed the choice by pressing Enter.

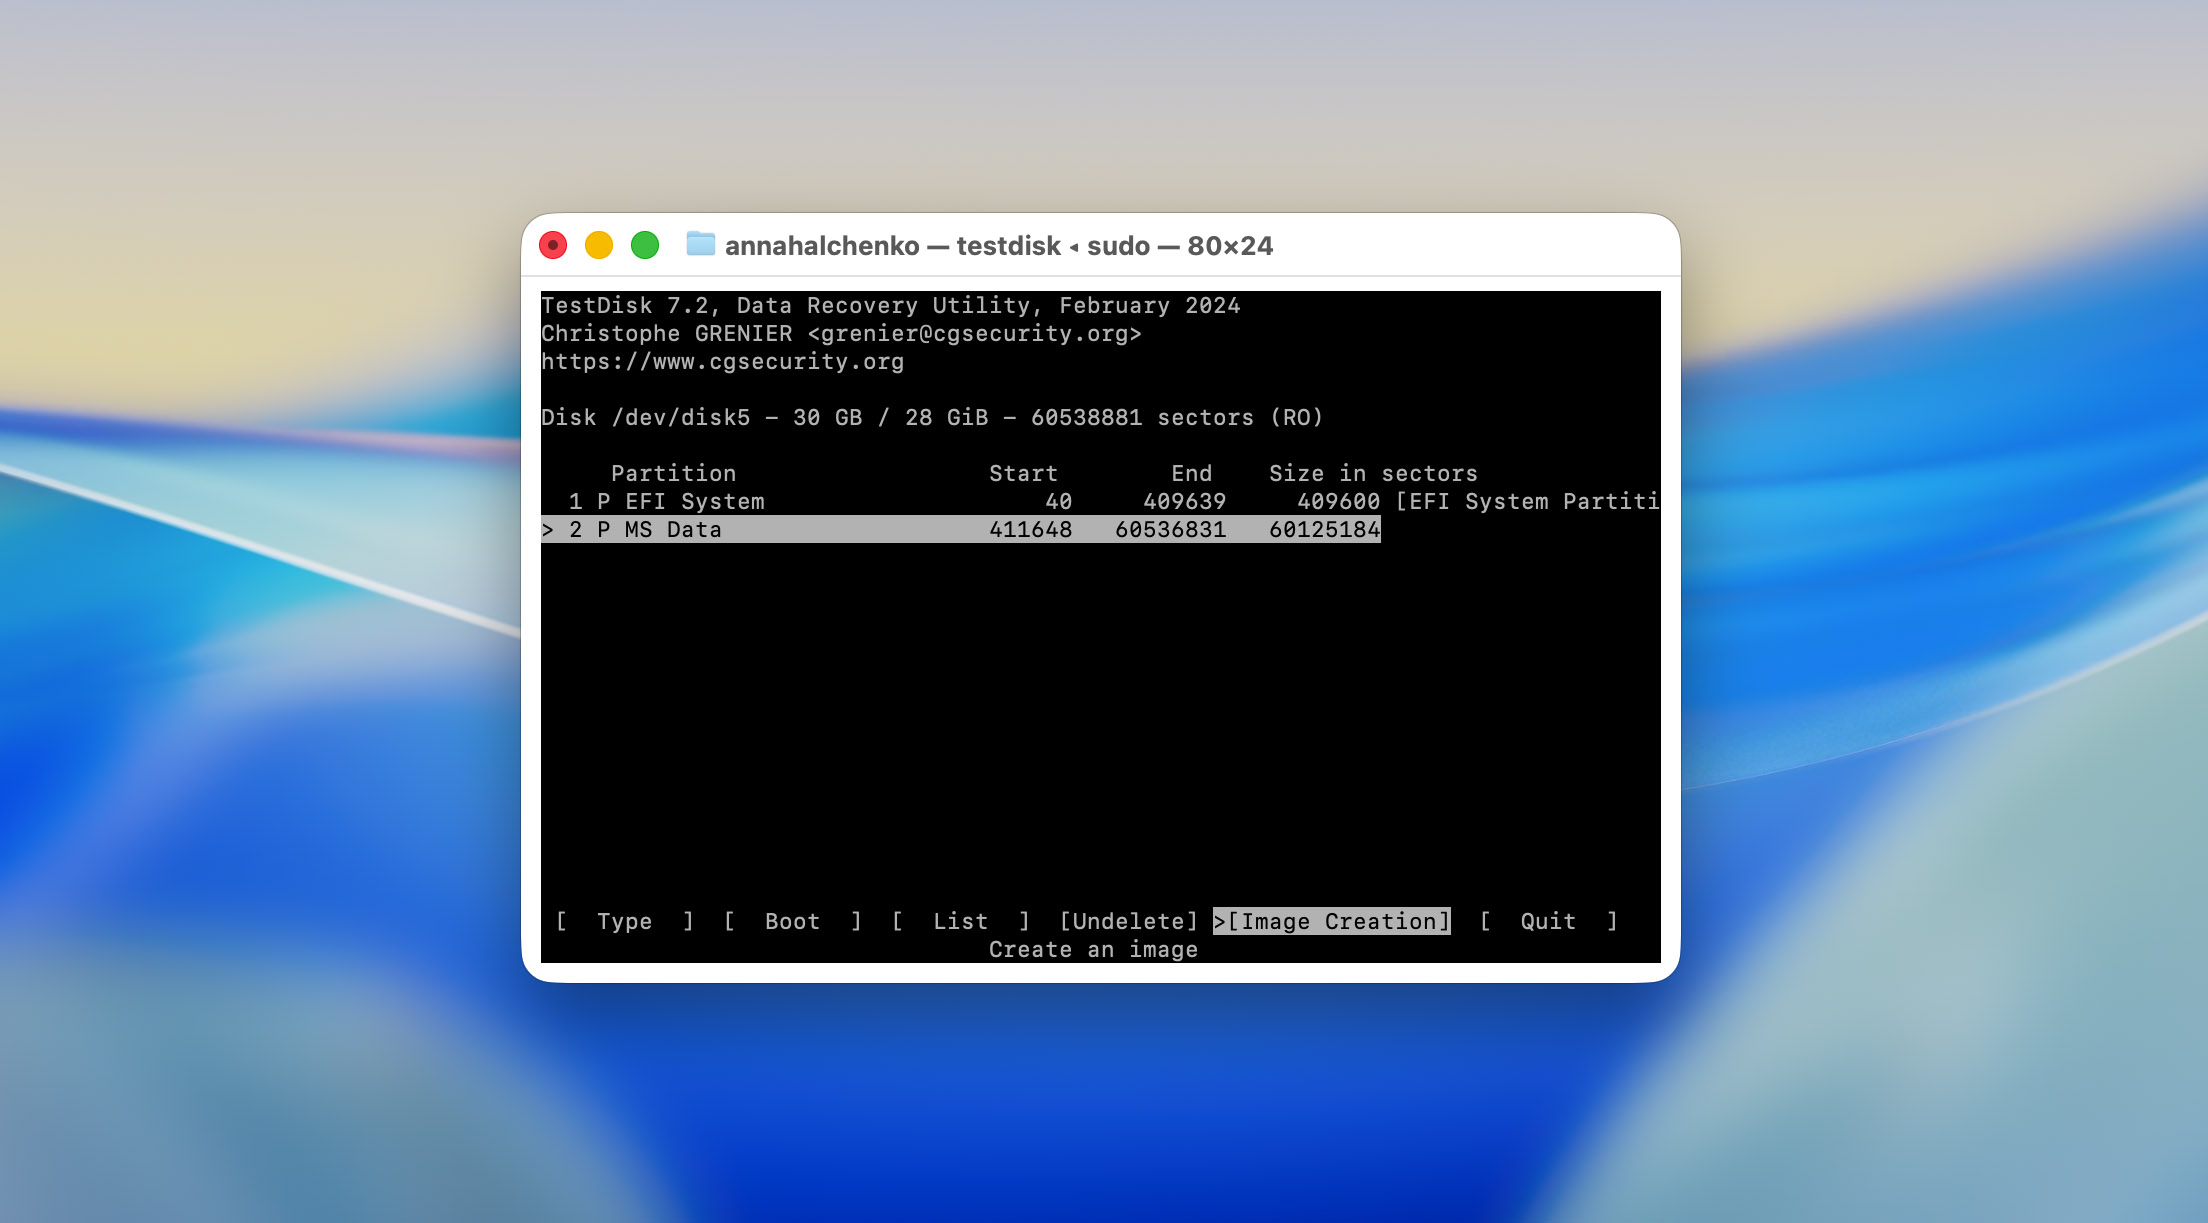
- After confirming the partition structure, we moved to the Advanced section. This part of TestDisk contains the key maintenance tools, including Undelete, which we needed for our test.
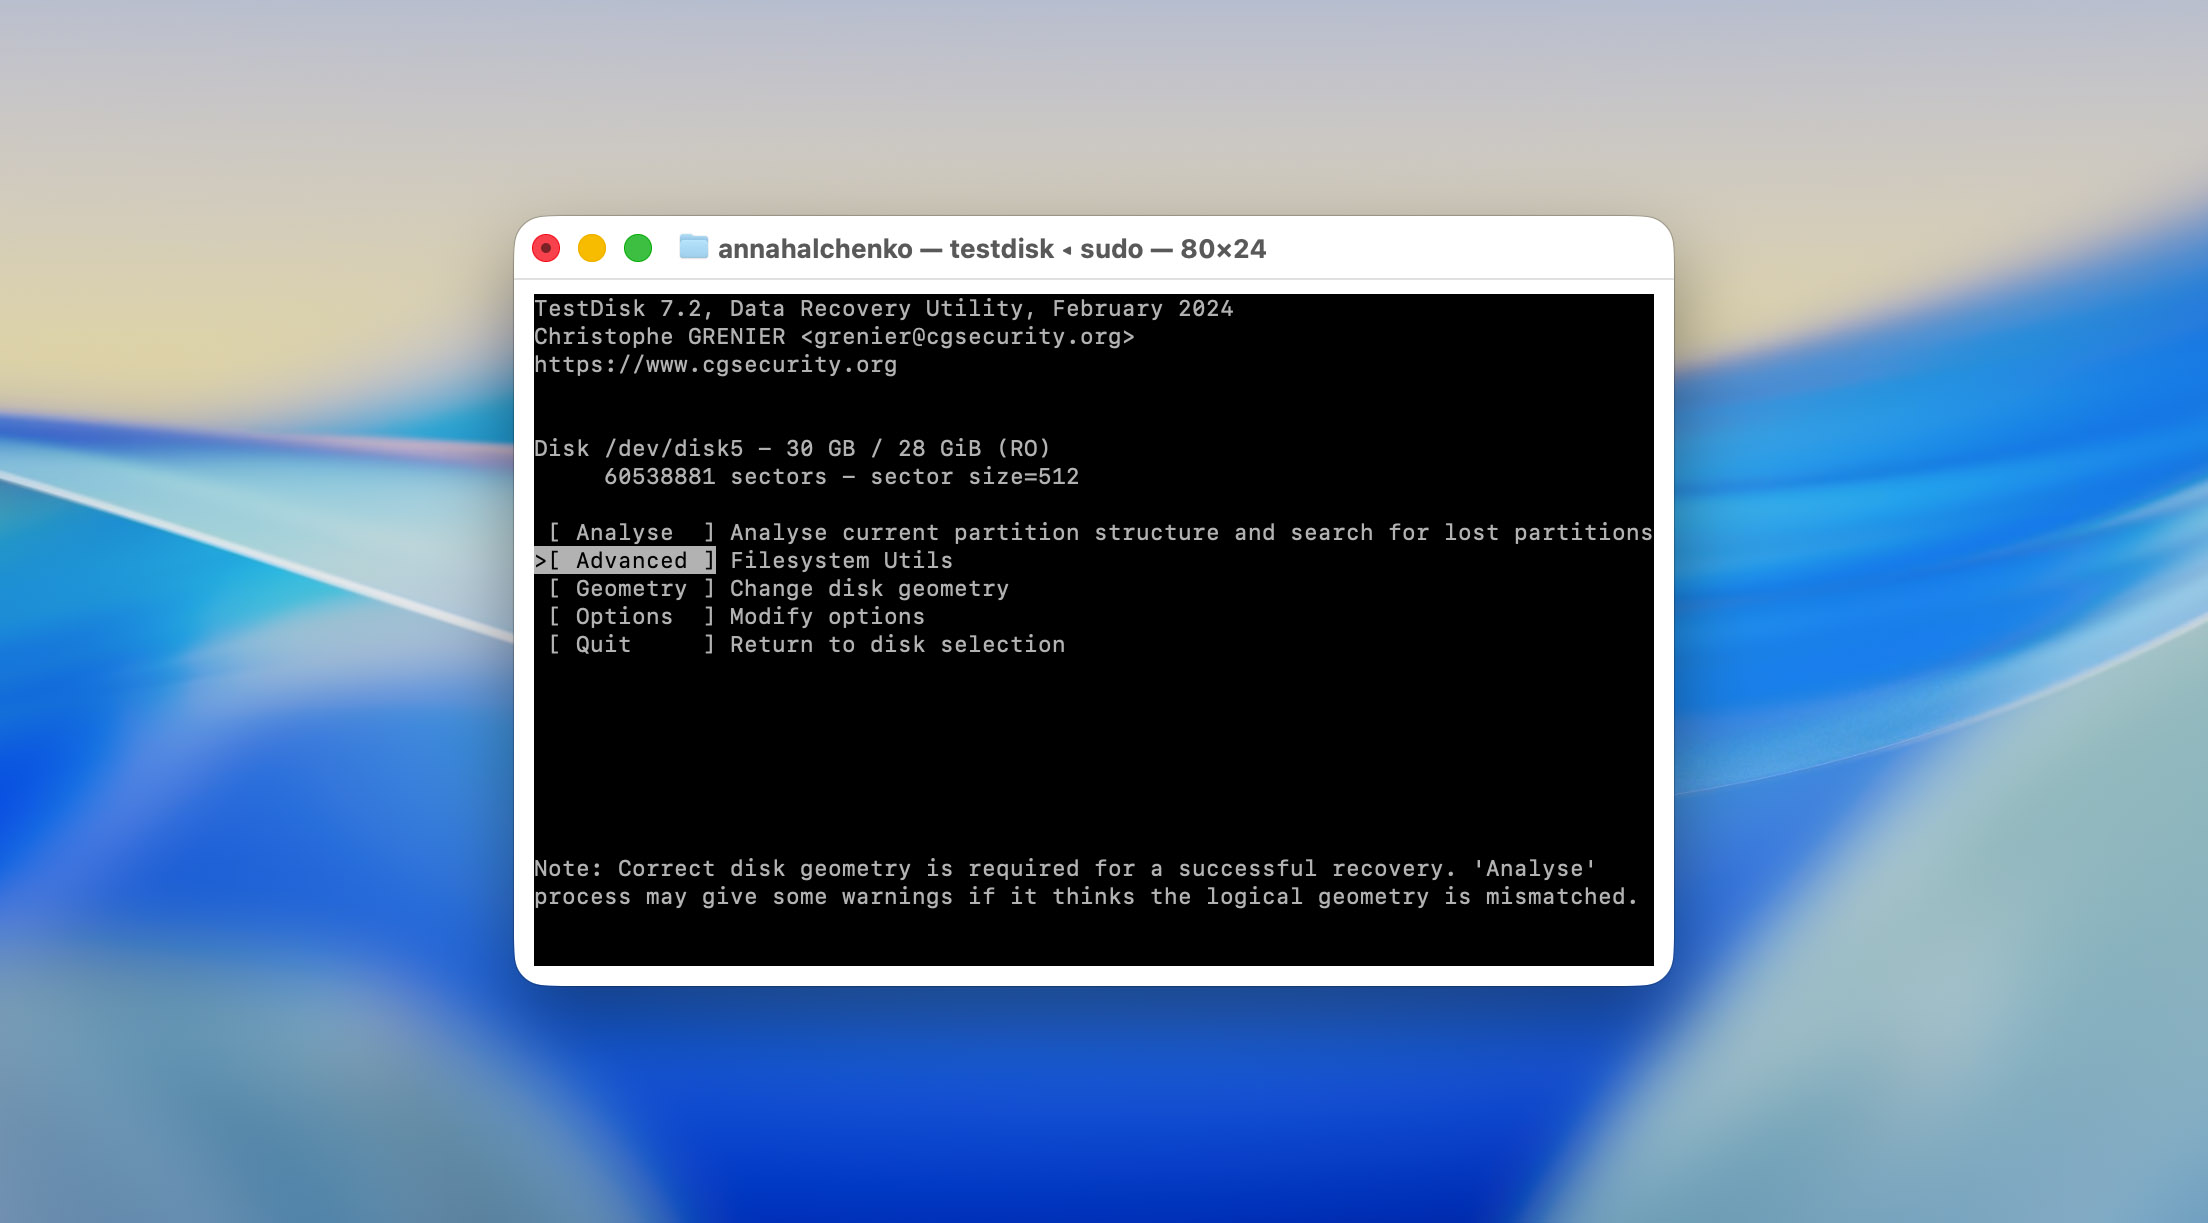
- Inside the Advanced section, TestDisk displayed the partition available for analysis. We selected it and pressed Enter, then chose the [Undelete] option. The program quickly scanned the file system metadata and listed files that could still be recovered.
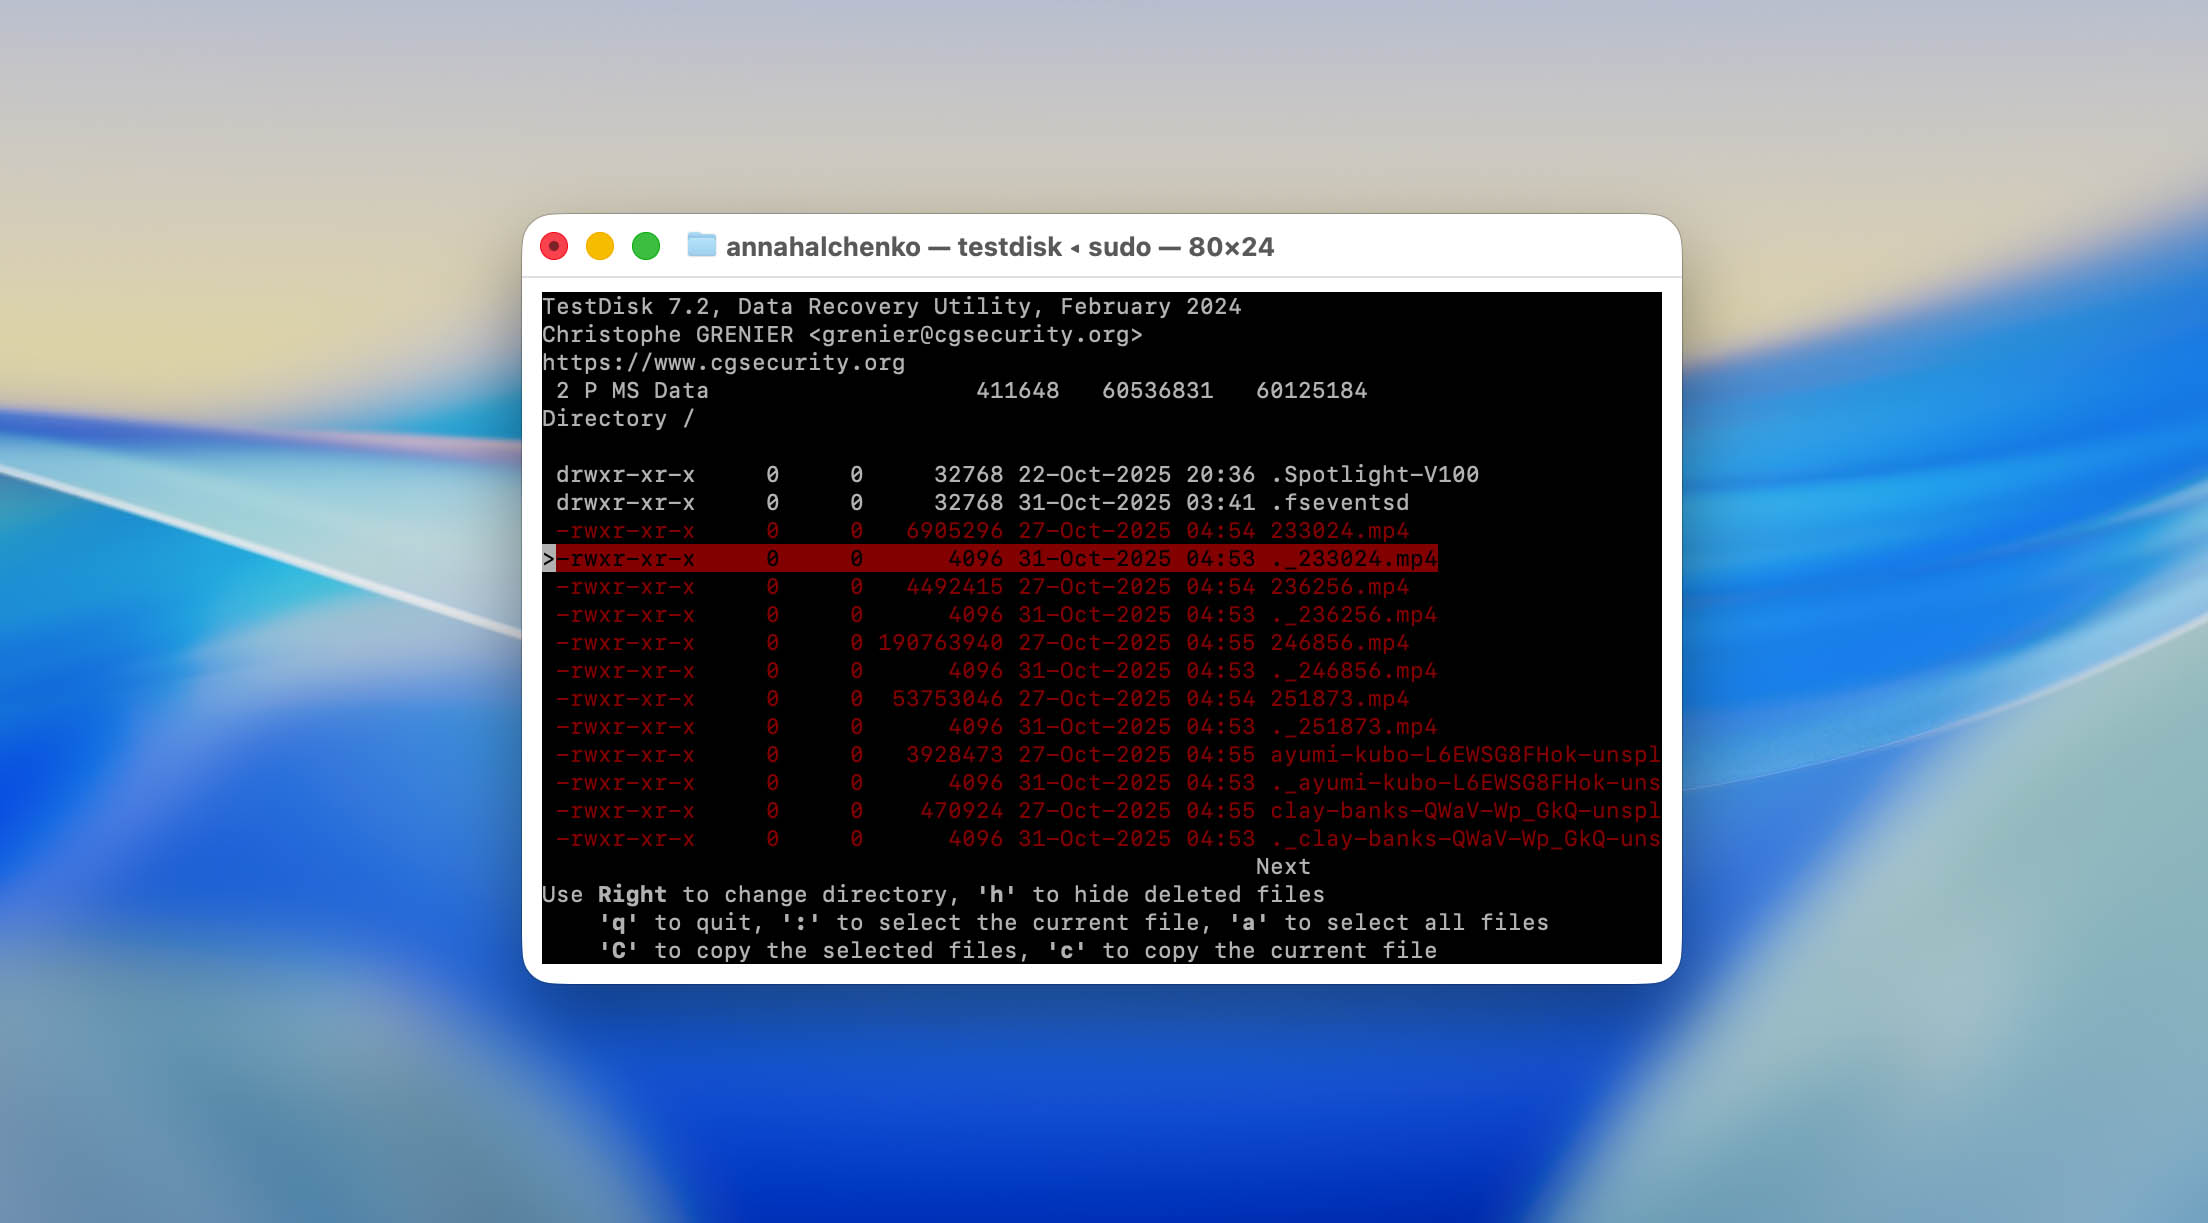
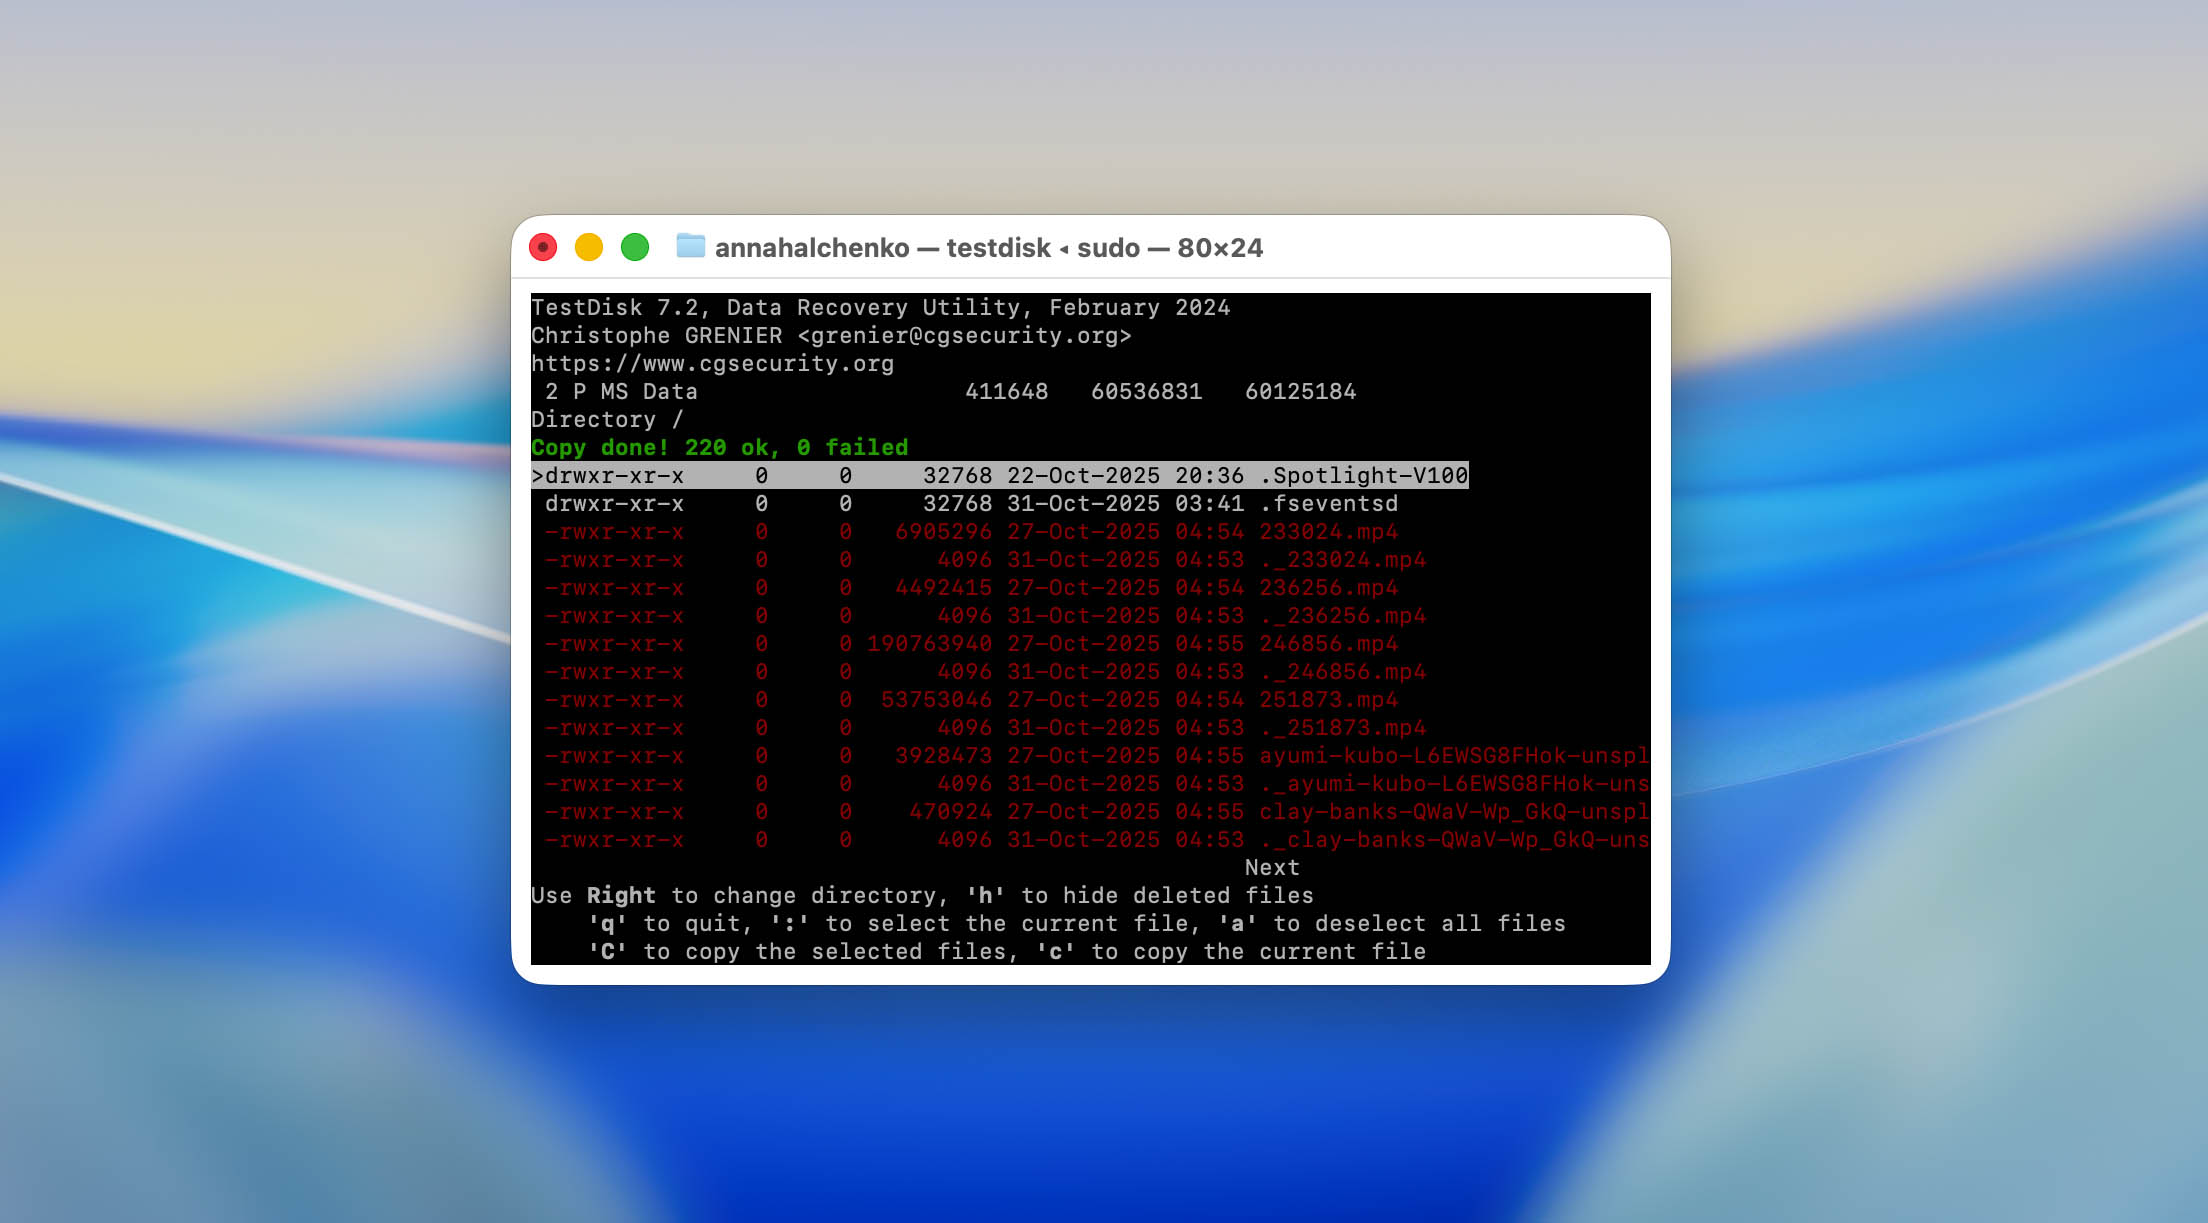
- All recoverable files appeared in a plain text-style directory view. We used the arrow keys to navigate and the a key to mark all files for recovery.

- Once the files were selected, we pressed C (uppercase C) to copy them. TestDisk then asked where to save the recovered data.

It’s critical to choose a different drive or folder; never restore files to the same SD card. Otherwise, new data could overwrite what’s left of the deleted files.
- We saved the recovered content to the Mac’s internal drive. TestDisk confirmed the copy process with simple text messages like “Copied X files OK.”
After exiting the program, we checked the output folder. All selected JPEGs opened without corruption, and three of the four MP4 videos played fully, while the other was corrupted.
2. Partition Recovery on the Corrupted USB Drive
The second test focused on what TestDisk was originally built for — repairing damaged partitions. We used a 32 GB USB flash drive that had previously been part of our recovery benchmark set. Its file system was deliberately corrupted.
- Just like before, we launched TestDisk from Terminal using sudo testdisk.
- We created a new log file again to record the process.
- On the list of connected devices, TestDisk correctly displayed our USB flash drive by its size and model name, even though macOS had treated it as unreadable. We selected the drive and pressed Enter to continue.
- The program automatically recognized the drive’s structure as Intel/PC partition. We confirmed the detection to proceed with analysis.
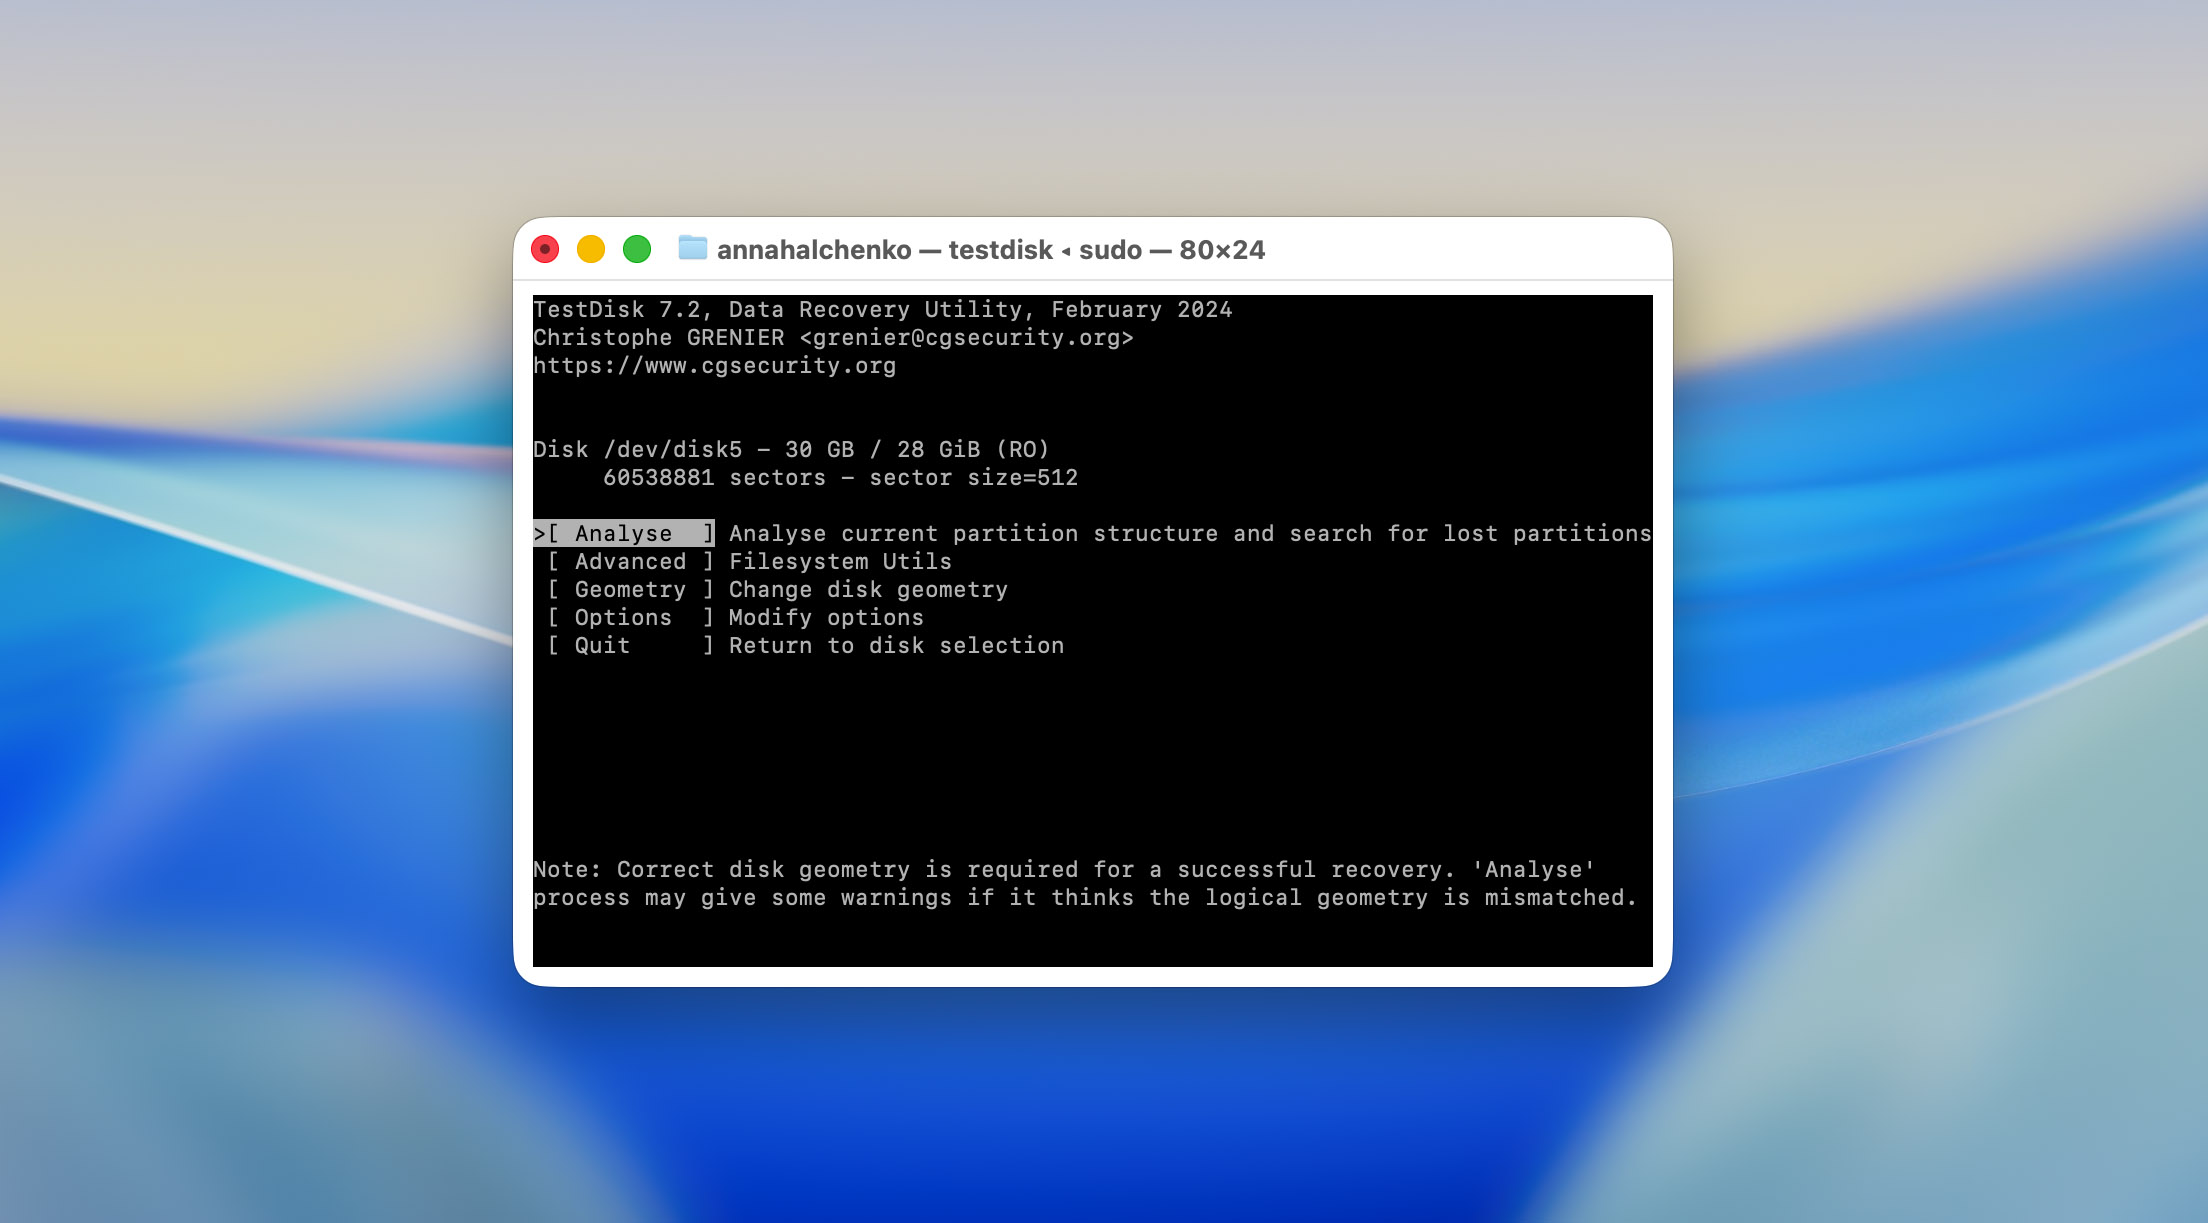
- The next screen offered several options: Analyse, Advanced, Geometry, and others. We chose [Analyse] to start searching for lost partitions. TestDisk quickly scanned the beginning of the drive and reported that the current partition table appeared damaged.
- After pressing Quick Search, the tool began scanning for previously known partition entries. The process took around 4-5 minutes for our 32 GB drive.
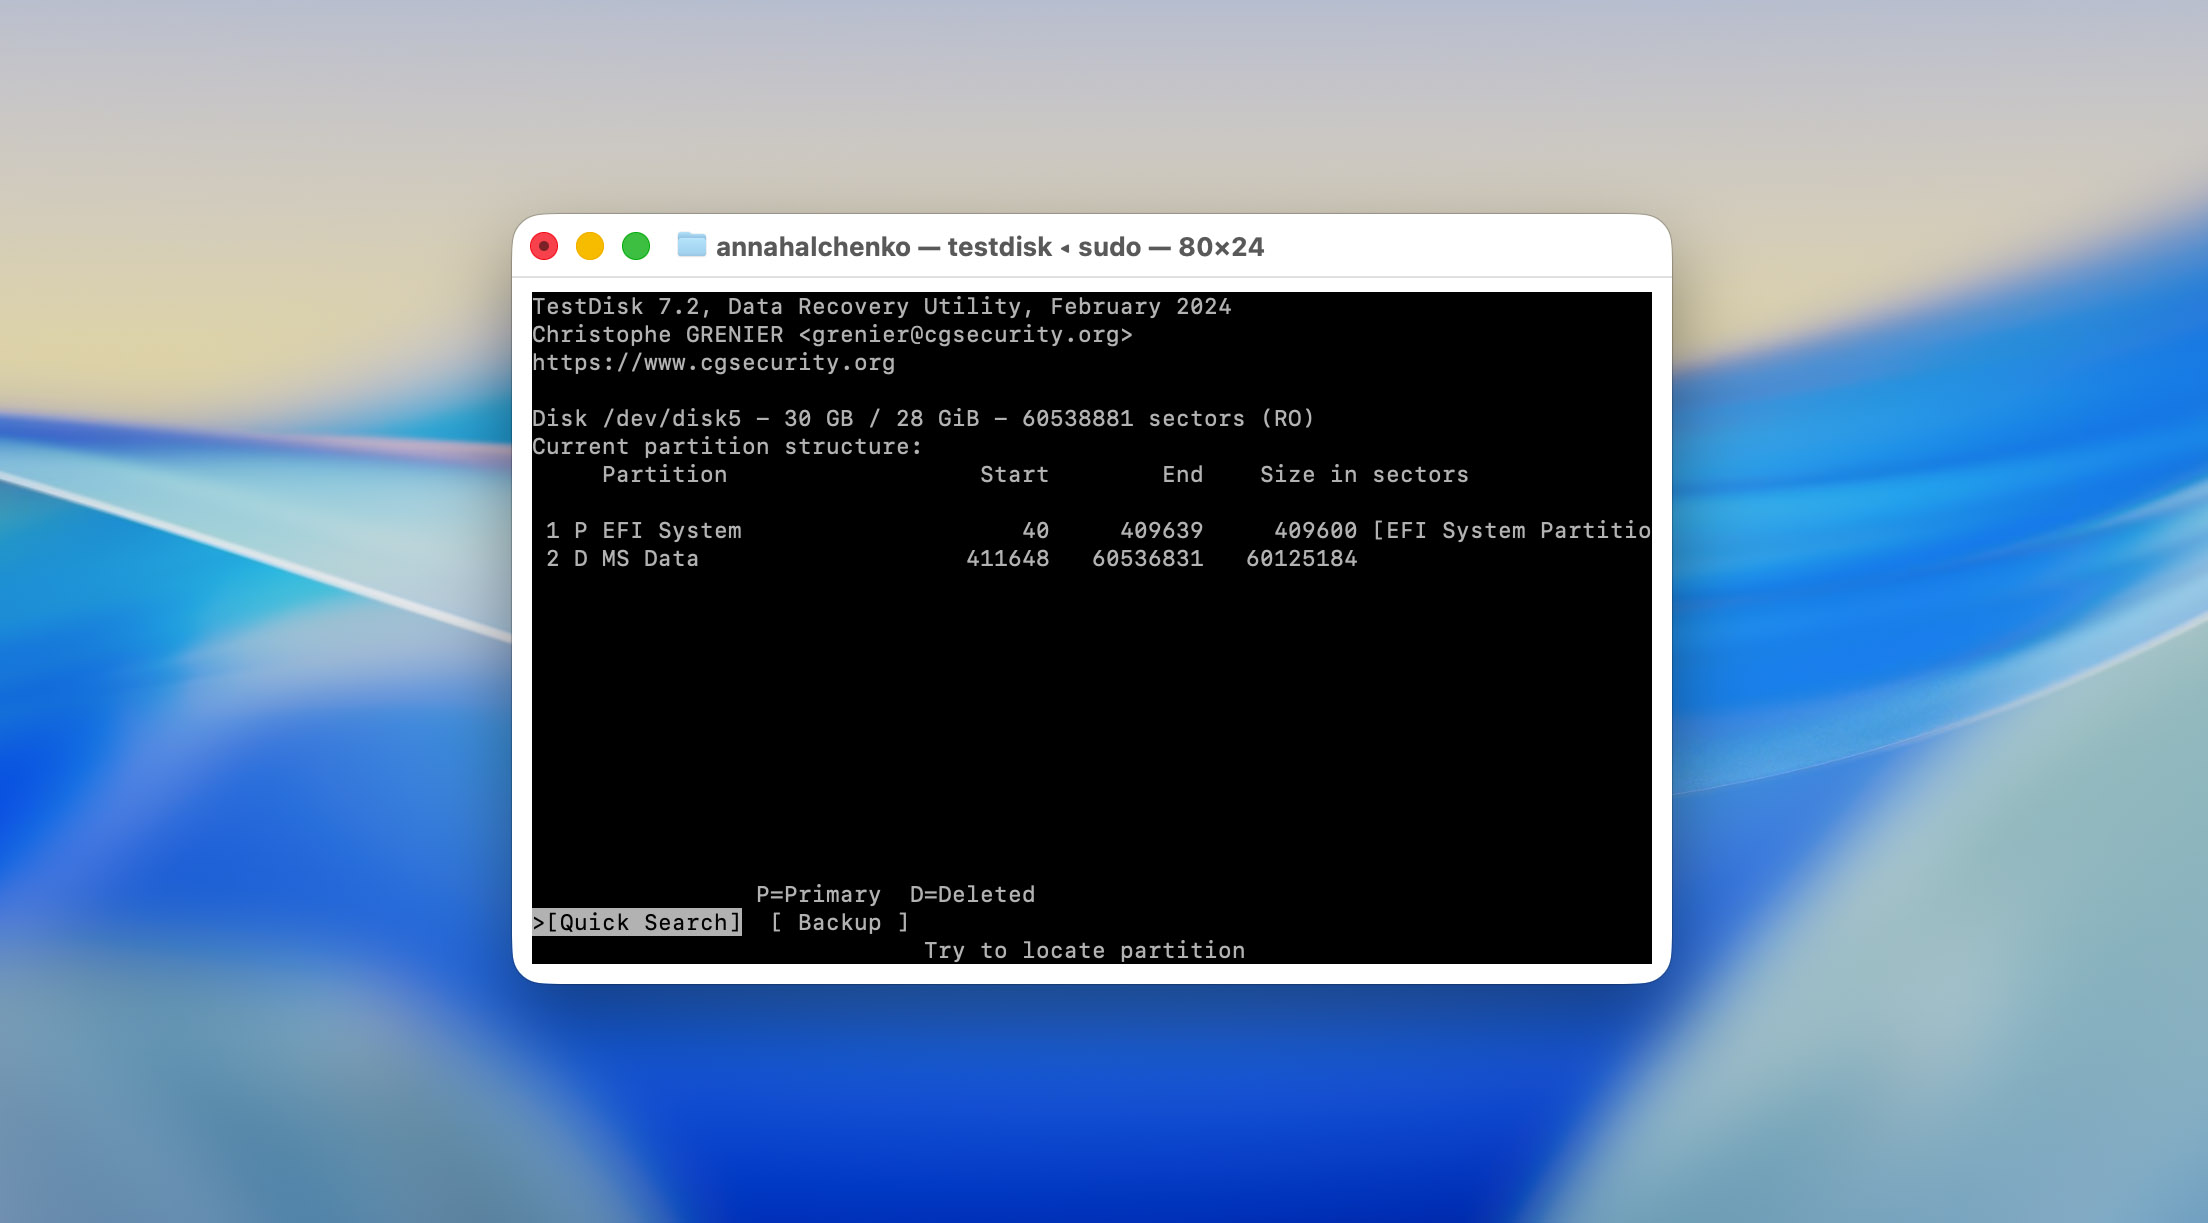
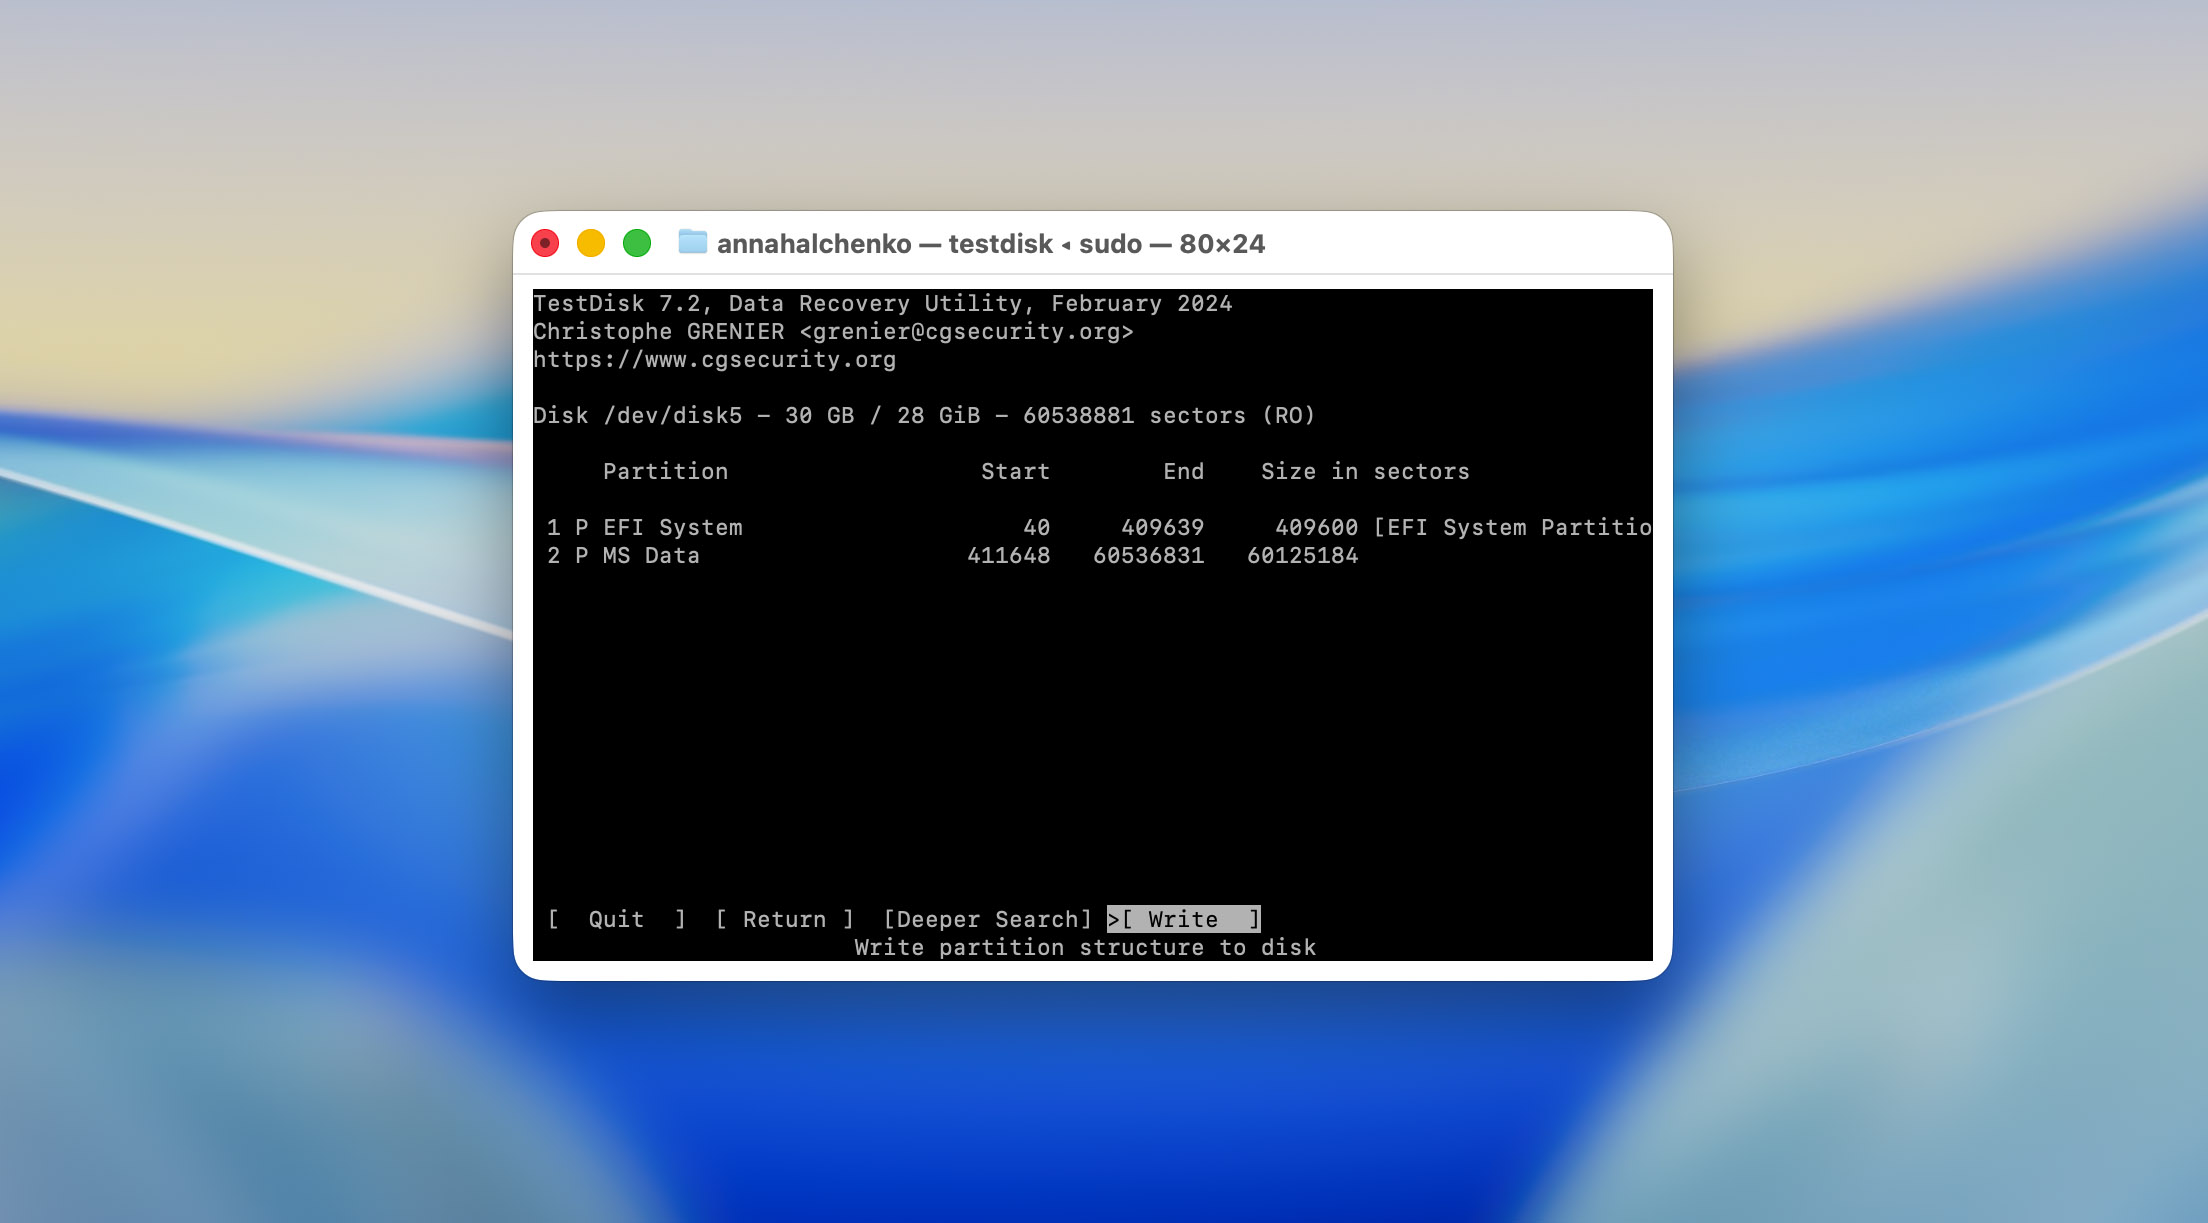
- Once the scan finished, TestDisk listed two partitions, one labeled FAT32 (the original) and another marked as deleted. The program lets you move between results using the arrow keys and shows details like start and end sectors. We confirmed that the first result matched our original partition layout (based on the size and file system type).

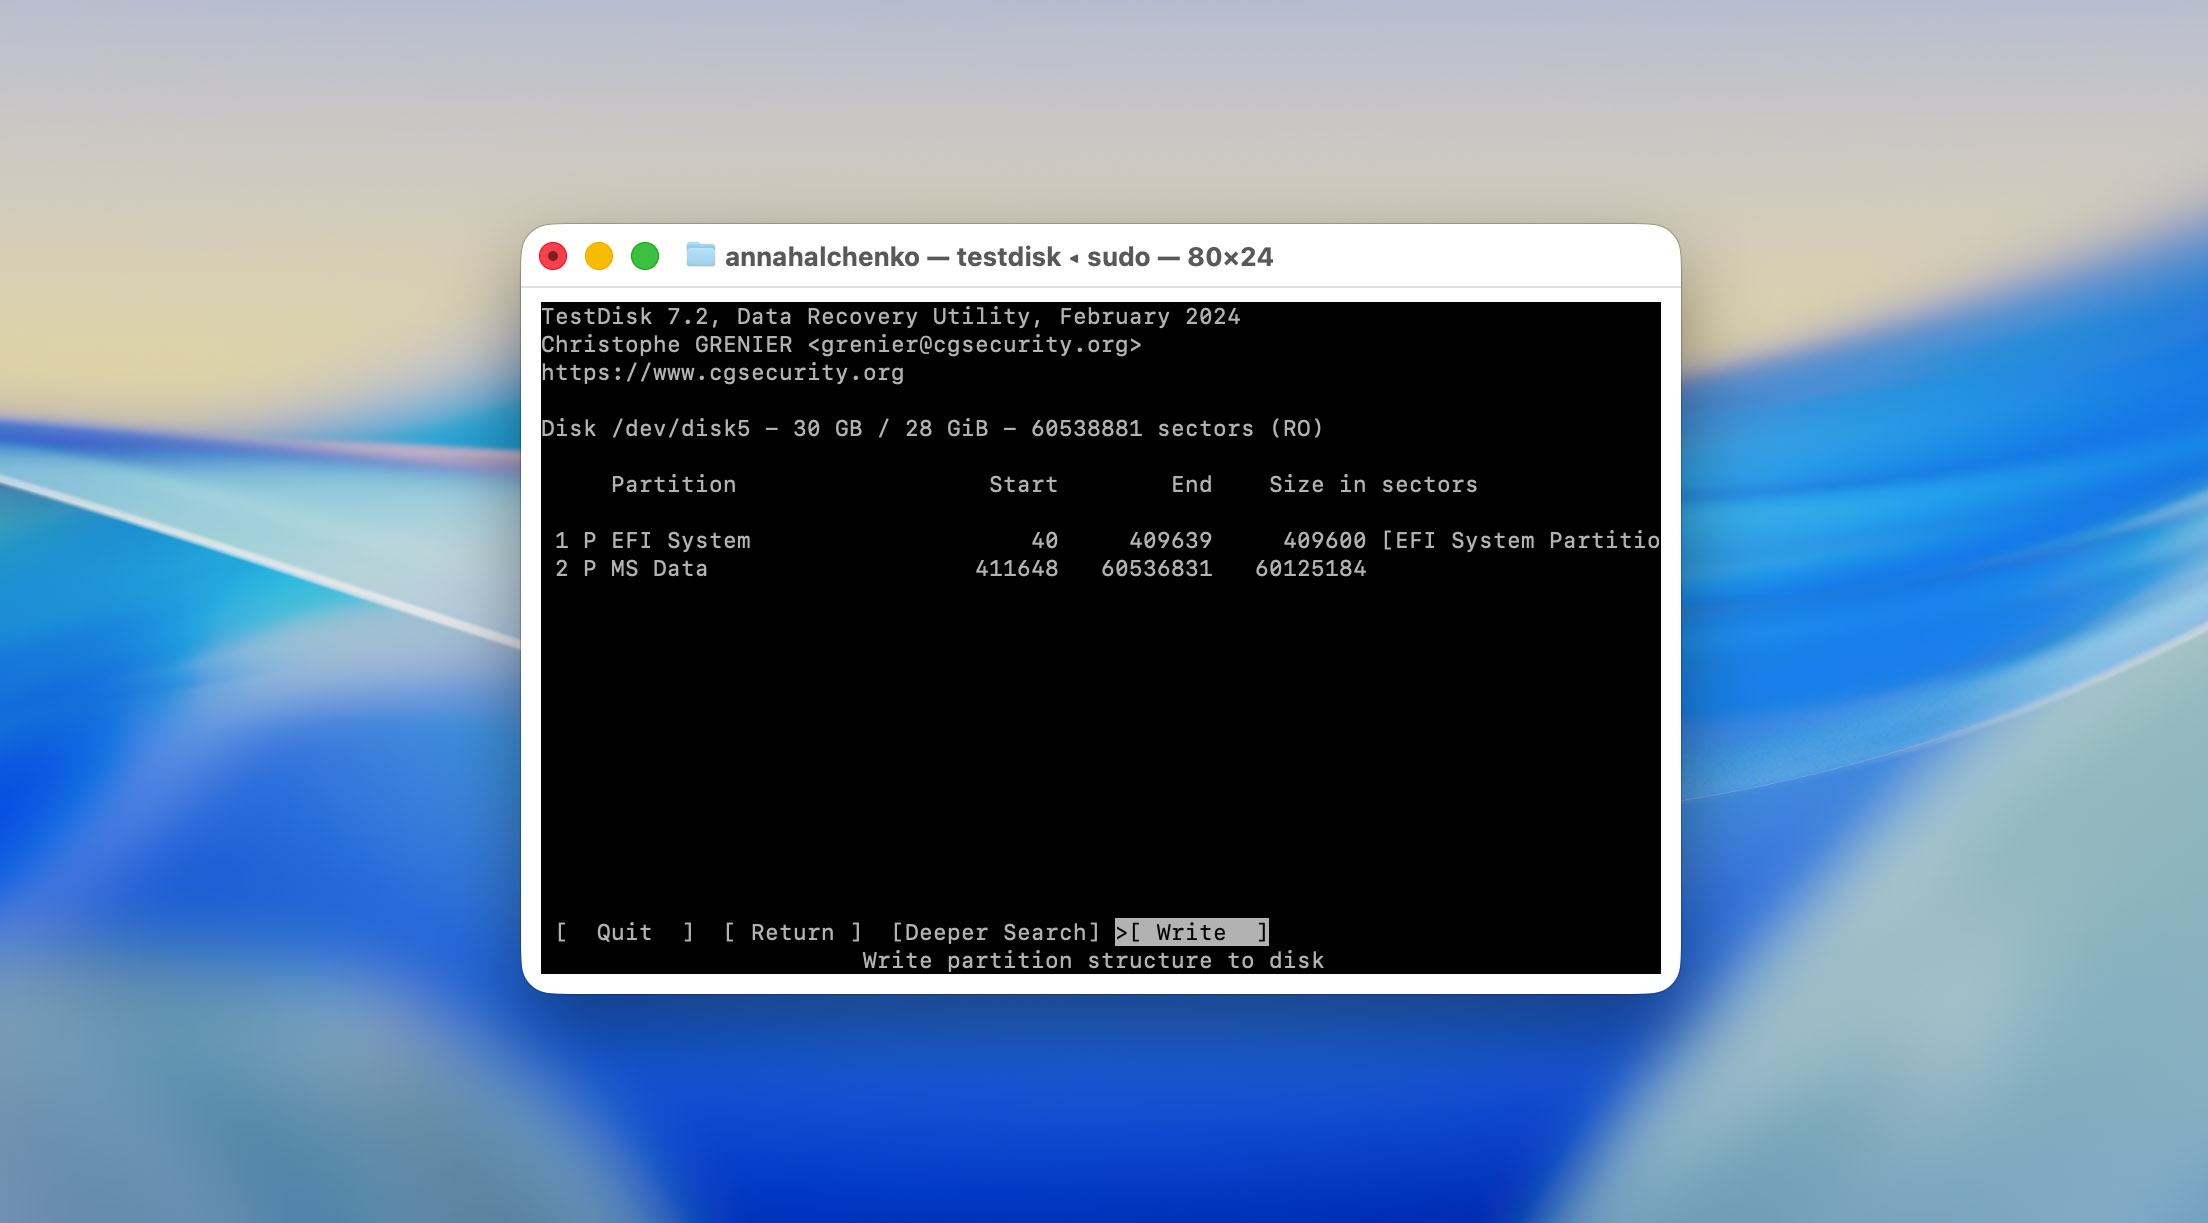
- To restore access, we pressed Enter and chose [Write] to update the partition table with the recovered data. TestDisk asked for confirmation before writing changes to the disk. After we agreed, it displayed the message “Partition table has been written.”
Is TestDisk safe to use? This question comes up frequently, and for good reason. Some guides warn that TestDisk can cause data loss, and that’s partially true. The program itself is safe, provided it’s downloaded from official sources and installed using legitimate methods such as Homebrew or directly from CGSecurity’s site. However, the actions you choose inside the interface matter. Selecting the wrong partition or writing changes to the wrong drive can overwrite existing data and make recovery impossible. That’s why it’s always best to pause for a moment than to press Enter too soon.
After exiting TestDisk, we ejected and reconnected the USB drive. macOS immediately recognized it, the volume mounted successfully, and all test files were visible again in Finder. Every file that had been present on the flash drive before corruption was accessible and intact.
In practical terms, this test confirmed what the developer has always emphasized: TestDisk doesn’t recover files one by one, it restores access to entire partitions. When the damage is logical rather than physical, this approach can bring back an entire drive’s contents in a single operation.
3. Evaluation of Results
Our testing produced two very different outcomes, both revealing in their own way.
- In the first scenario, where we used an SD card with manually deleted files, TestDisk performed as well as could reasonably be expected. All JPEG photos were recovered successfully and opened without corruption. Out of the four MP4 videos, three played correctly, while the other was partially damaged and wouldn’t open properly.

This limitation isn’t really the fault of TestDisk itself. The videos on the SD card were recorded with a DJI camera, which stores video in fragmented chunks across the card. Recovering fragmented video is a challenge even for advanced commercial tools. In fact, the only software we’ve seen handle such cases reliably is Disk Drill, through its Advanced Camera Recovery mode, which can reconstruct video fragments based on internal patterns. TestDisk simply doesn’t have that kind of logic built in, so the partial failure here is entirely understandable.
- The second test, involving the corrupted USB drive, was a complete success. Once we repaired the partition, the drive mounted normally on macOS, and all files reappeared intact. There was no data loss or file corruption detected afterward.
- As for scanning speed, it was relatively quick, under 10 minutes for both test devices (each with 32 GB of storage). However, it’s worth noting that these were small drives. On full-sized hard disks or SSDs with hundreds of gigabytes of data, the process would naturally take longer.
- When it comes to ease of use, our experience was smooth, but that’s because our team has worked with TestDisk many times before and frequently references it in recovery guides. For someone launching it for the first time, the story would be very different. As we’ve already noted, TestDisk isn’t a “click-and-go” utility. Without at least a basic understanding of its structure and workflow, the chance of making a mistake or overwriting data is high.
Users’ Feedback
We understand that our review offers just one perspective on TestDisk, so to give you a fuller picture, we also gathered real-user responses from several platforms. This way, after reading our evaluation, you don’t need to dig through dozens of threads to see how people rate the software in the field.
| Source | Rating | Number of Reviews |
| G2 | 4.3 out of 5 | ~12 reviews |
| SourceForge | 5.0 out of 5 | ~2 reviews |
| Trustpilot | 4 out of 5 | ~3 reviews |
| AlternativeTo | 4.7 out of 5 | ~21 reviews |
| CGSecurity forum | – | It’s hard to count, because most of the thank-you messages and user feedback are buried inside forum threads, and there are nearly 30,000 of them |
Positive experiences often highlight that the program performs exceptionally well in critical cases where commercial tools fail. One reviewer on G2 shared: “TestDisk helped me recover a lost partition from a drive that Windows could no longer see. It’s completely free and does what paid tools couldn’t.” On SourceForge, another user wrote: “Has saved me more than once and has never let me down. Best recovery software I’ve ever used by far.” Similar praise appears on the CGSecurity forum, where users thank the developer for creating “a real lifesaver” after successfully restoring access to drives marked as RAW or unbootable.
Still, not all feedback is positive. The most common complaints focus on the user interface and overall accessibility. A TenForums discussion described the tool as “safe but confusing,” adding that while it’s powerful, it “requires careful reading of guides to avoid overwriting data.” Several users also mention slow scanning speeds on large drives and the lack of real-time progress feedback. Yet, most agree that these issues are forgivable given the price tag, or rather, the lack of one.
In short, the user community confirms what we found: TestDisk is a powerful, free tool for disk structure repair and partition recovery, if you know what you’re doing. For less technical users expecting a one-click file recovery wizard, feedback tends to be more reserved.
Competitors vs TestDisk
If you’ve read this far, you’ve probably realized that TestDisk isn’t the best data recovery program for macOS, though it’s completely free. It shines in structural repairs, not in file recovery. Still, there are situations where you may need something more capable, for instance, when you lose data from your system disk, or when external drives get formatted, corrupted, or contain fragmented video files.
So, to help you make a quicker and more informed choice, below we compare TestDisk with several well-known recovery tools. We wanted to include more free options, but on macOS there aren’t many truly functional ones, so the list also features commercial apps worth considering.
| Parameter | TestDisk | PhotoRec | Disk Drill (Pro) | R-Studio |
| Ease of Use | Command-line only; steep learning curve | Basic text interface | Full GUI with guided workflow | Advanced GUI; complex but structured |
| Supported OS | macOS, Windows, Linux, BSD, DOS | macOS, Windows, Linux, BSD | macOS, Windows | macOS, Windows, Linux |
| File Systems | FAT, exFAT, NTFS, ext2 (partition-level repair) | Works on raw data, file system-independent | APFS, HFS+, FAT, exFAT, NTFS, EXT, others | APFS, HFS+, FAT, exFAT, NTFS, ReFS, EXT, UFS |
| Signature Types | None (metadata-based only) | 480+ supported file types | 400+ file signatures | 500+ file types, customizable |
| Preview Before Recovery | No | No | Yes, full media and document preview | Yes, with file size filters |
| Scan Speed | Moderate (depends on partition size) | Fast for signature scans | Fast and optimized for SSDs | Slower on large disks but deep |
| Fragmented Video Recovery | No | No | Yes (Advanced Camera Recovery) | No |
| RAID/NAS Support | Limited (manual only) | No | Basic RAID support | Yes, full RAID/NAS support |
| Extra Utilities | Partition repair, boot sector rebuild | File signature recovery, raw scan | Duplicate finder, data protection, cleanup tools | Disk imaging, hex view, network recovery |
| Free Edition | 100% free, open-source | 100% free, open-source | Free preview only | Demo with limited recovery size |
| Price (Pro license) | Free | Free | $89 (lifetime per user) | $79.99–$899 depending on license |
| Value for Money | – | – | most balanced for Mac users | pro-grade tool, costly for casual use |
TestDisk stands apart as a technical repair tool, not a user-friendly data recovery suite. PhotoRec complements it well for raw file retrieval, but both require patience and command-line comfort. Disk Drill remains the most approachable and complete solution for macOS users, especially when dealing with fragmented media files or APFS disks. Meanwhile, R-Studio targets professionals who need advanced control, RAID reconstruction, and forensic accuracy.
Our Verdict
By now, you can probably guess what our verdict will be, as this thought has followed us from the very beginning of this TestDisk review. It’s undoubtedly a top-tier utility when it comes to working with RAW partitions, restoring boot sectors, or fixing damaged partition tables. But it’s not a data recovery program in the classic sense.
If you’ve just deleted files and realized your mistake, and TestDisk happens to be the only tool at hand, it might save you. However, if you’ve already formatted the drive, overwritten files, or dealt with severe corruption, this utility won’t help much. In those situations, you’ll need to look for an alternative.
With that in mind, it’s better to plan ahead and pair TestDisk with a true data recovery program. If you want something free, PhotoRec (from the same developer) is the obvious companion. But if you prefer a cleaner interface, easier workflow, and broader recovery options, tools like Disk Drill or other commercial apps will serve you much better. We’ve reviewed several of them, so you can explore those comparisons on our site.
📝 Summing everything up: we give TestDisk 9 / 10 (★★★★☆) as a utility for recovering lost partitions and making non-booting disks usable again. As for data recovery, we rate it 4 / 10 (★★☆☆☆), not because it’s a bad program, but because that’s simply not what it was built for.


